Full Issue: AccessWorld July 2010

AccessWorld News

AFB CareerConnect Seminars

AFB CareerConnect presents two new, free online seminars for professionals working with children and adults with visual impairments.

Session 1: What's Next…Postsecondary Training Preparation for Students with Visual Impairments

Release Date: June 15, 2010
Length: 90 minutes

Dr. Karen Wolffe, Career Counseling & Consultation, will discuss available resources and critical skills that young adults with visual impairments need to acquire before graduation from high school to be successful in postsecondary training programs. A panel of young adults (and service providers) will join her for a discussion of self-advocacy techniques.

Session 2: Technology and Visual Impairment in Higher Education

Release Date: June 16, 2010
Length: 90 minutes

Ike Presley, project manager of professional development at AFB, will discuss current trends in technology and implications for both high school and postsecondary training. Tips for the transition into postsecondary education will highlight technological solutions for everything from lectures to labs. Current students will join Ike to share their personal experiences and advice.

Both seminars will be available live on your computer. For more information, and to register for one or both webcasts today, visit the webcasts page, call 1-800-232-5463, or e-mail careerconnect@afb.net.

Ingram's VitalSource Delivers Accessibility Release for Bookshelf

VitalSource Technologies Inc., an Ingram Content Group company, has announced an "accessibility release" for its industry-leading VitalSource Bookshelf e-textbook platform.

The release, which makes the application more usable for visually impaired students, contains extensive internal feature and function enhancements, as well as support for third-party screen-reader applications. These new features include the new Document Type Definition v3.4 and VitalSource's "MathSpeak" program, which adds rich English-language articulation to MathML tags. In addition to the accessibility features, the new release also includes enhanced navigation for users, automatic updating of content, enriched reference and dictionary options, and simplified content ingestion for publishers.

Windows, Macintosh, and online updates were released in June, and iPhone, iPod Touch, and iPad releases are planned for August.

AFB Consulting, AFB's accessibility consulting arm, has worked with VitalSource for months, reviewing applications and recommending new accessibility features.

American Foundation for the Blind Expands Presence in Huntington, West Virginia

The American Foundation for the Blind has opened a new 6,000-square-foot office and optics lab in Huntington, WV. Foundation leadership and West Virginia Governor Joe Manchin III attended a ribbon-cutting ceremony on June 16.

"West Virginia has been instrumental in helping us expand possibilities for the 25 million Americans with vision loss and we are extremely proud to be a part of the wonderful community in Huntington," said Carl R. Augusto, AFB president and CEO. "We have an impressive team working for us at AFB TECH and we've been welcomed with open arms by the leadership and people of this great state."

AFB TECH, the technology arm of AFB, first opened in Huntington in 2001 with just three staff members. The office has now grown to almost 20 employees and several interns from Marshall University. AFB recently relocated its finance department and other key positions from its New York headquarters to West Virginia.

"West Virginia is honored to be home to AFB's optics lab," said Gov. Joe Manchin. "It's amazing to think that the technology being developed and implemented right here in Huntington is making a world of difference for so many across our nation."

AFB TECH has garnered national recognition for its work to make critical technology—from lifesaving diabetes equipment to smart phones—accessible to people with vision loss. Also located at the Huntington office is AFB CareerConnect, a Web-based program for blind and visually impaired students, job seekers, and potential employers that works to combat the shockingly high unemployment rates among people with vision loss.

AFB TECH is now located at 1000 Fifth Avenue, Suite 350, Huntington, WV 25701. Learn more about AFB TECH online.

Free Computer Games for Children Who Are Blind or Visually Impaired

This article offers a list of free educational computer games for blind or low-vision children.

Scientists Unveil Bionic Eye for Future Implantation

Researchers have unveiled a prototype bionic eye that will be implanted into Australia's first recipient of the technology. The prototype, developed by Bionic Vision Australia scientists at the University of New South Wales, is expected to improve vision and prospects for independence for patients suffering from degenerative vision loss caused by retinitis pigmentosa and age-related macular degeneration. The researchers hope that future prototypes may allow users to recognize faces and read large print.

The device, which is currently undergoing testing, consists of a miniature camera mounted on glasses that captures visual input, transforming it into electrical signals that directly stimulate surviving neurons in the retina. The implant will enable recipients to perceive points of light in the visual field that the brain can then reconstruct into an image.

U.S. Bills Could Change Size, Shape, Texture to Help the Blind

The U.S. Department of the Treasury will soon unveil its plans for a new universal American currency that better accommodates the blind and visually impaired.

The change is in response to a 2008 U.S. Court of Appeals decision that upheld a lower court's ruling that the U.S. Department of the Treasury had violated Section 504 of the U.S. Rehabilitation Act of 1973 by not providing currency readily identifiable by the blind and visually impaired.

At an October 2009 American Council of the Blind affiliate meeting, the Bureau of Engraving and Printing showed some attendees prototypes that had notches, holes, foil, and raised dots. It is likely that the new bills will feature some combination of these changes.

The new currency is expected to be rolled out in the next five to eight years.

An Interview with Nolan Crabb

A fondly remembered toy Nolan Crabb received for Christmas in 1965 may well have been the precursor for a career he would find and adore several decades later. The then seven-year-old wasn't as enamored with the plain old push cars and trucks enjoyed by his siblings. Instead, he wanted a bit of magic. The amazing all-metal locomotive that he received that year was right up his alley. It had whistles and bells and could zoom anywhere in the house. It even knew how to back up when it banged into the furniture.

There were later indications during his youth of a future in technology. He recorded "radio shows" and then broadcast them from his own transmitter, proudly listening as an audience of one sitting in his dad's parked car. As so often happens, though, his educational and professional journey would take numerous twists and turns before he would finally arrive at what he describes as "the best three years I have ever spent anywhere"—the three years he has served as director of assistive technology for The Ohio State University (OSU).

Many AccessWorld readers may remember Nolan Crabb as the editor of Dialogue magazine in the 1980s or, later, as editor of The Braille Forum, the publication of the American Council of the Blind in the 1990s. Those roles, like others at newspapers and newsletters of varying sizes that have dotted his career path, were in line with his bachelor of arts degree in communications, received from Brigham Young University in 1981. Along the way, however, he was bitten by the technology bug, as he puts it, and had an increasing awareness that working with assistive technology was where he wanted to be. There were a few stints cutting his teeth in assistive technology early in this decade—training users of assistive technology with the Missouri Rehabilitation Services for the Blind, for example—where he learned he loved sharing the power of technology with others and simply wanted more of the same.

As director of assistive technology at OSU, Crabb is the sole staff member called upon to assist faculty and staff with all matters related to assistive technology. He reports to OSU's Americans with Disabilities Act coordinator, Scott Lissner, and currently has only one assistant, a student named Hannah Schroeder (yes, she is indeed the daughter of our first editor, Paul Schroeder), whom he describes as brilliant and incredibly hard working.

Crabb's role is multifaceted. First, he is responsible for keeping faculty up to date with regard to assistive technology available to students in their classrooms. Many professors, for example, employ the use of wireless devices called clickers for students to reply to verbal or written test questions. A professor might ask his or her students to click on their answer to a multiple-choice question. The responses are then registered electronically, providing instant feedback. For blind and low-vision students, Crabb installed braille clickers—that is, the same device with tactile markings and a vibrating capacity to enable blind students to participate in the same exercise.

Crabb frequently talks to faculty to make them aware of the latest assistive technology options so that students with disabilities are not excluded from participating in the classroom. He is responsible for maintaining accessibility in all labs and classrooms falling under the jurisdiction of the chief information officer. This means that screenreaders are readily available at workstations for anyone studying in those classrooms, libraries, or labs.

However, Crabb's work is by no means restricted to assistive technology benefiting staff or students who are blind or visually impaired. If a staff member has a learning disability, has had a stroke, carpal tunnel, or some other disability that interferes with typical use of computer applications, Crabb's role is to install and provide support on such applications as Dragon Naturally Speaking or Read and Write Gold. He is also responsible for supporting the assistive technology needs of blind or visually impaired graduate student employees.

When the university purchases applications to be used campuswide, Crabb is involved in those discussions to ensure accessibility. When OSU was ready to purchase new antivirus software, for example, and was considering Symantec, Crabb tested the program extensively and reported that the software was not particularly compatible with the JAWS for Windows, Window-Eyes, or System Access screen-reading programs. Thus, another choice, for at least the time being, was selected.

Similarly, for online courses created by professors, the campus choice has been a system called Desire2Learn. Crabb works with faculty, teaching them how to create online material that is accessible to students using assistive technology. He also has provided input to the company, which has led to its being a product of choice for other universities around the country.

Crabb was perhaps the first blind director of assistive technology on a large university campus to purchase and install the Remote Incident Manager and Remote Access Manager from Serotek Corp. With these applications, he is able to remotely assist faculty members having difficulty with assistive technology products, such as Dragon Naturally Speaking. Even though the faculty member being helped may be sighted and therefore not running any text-to-speech software, Crabb can access that individual's computer from his own, which is running with speech, and trouble-shoot the problem.

Although he is not responsible for the technology lab operated under the auspices of the Office of Disability Services, Crabb interacts with the staff there and is aware of its composition. Although the lab may not have the absolute latest version of every blindness-related product, he says that a laudable effort is made to keep all versions of screen-reading and magnification software up to date and that, if not the best in the country, it is certainly a lab that serves its population well.

He speaks with deep affection and pride for the myriad forward strides OSU has taken to provide a genuinely inclusive environment. One impressive example of this is the way in which any blind person with a phone capable of text messaging can receive up-to-the-minute campus bus information. From his iPhone, for instance, Crabb can send a text message asking when the next bus will arrive at stop #39. He instantly receives a text reply providing that information, which the system has gleaned via GPS technology to identify the location of specific buses.

Totally blind from birth due to retinopathy of prematurity, Nolan Crabb learned to read braille early on, and that medium, along with tape recorders of various shapes and sizes, was the tool he used throughout his college and early career years. Despite the disclaimer that he is "an old curmudgeon," Crabb displays far from curmudgeonly attitudes toward the differences between his own struggle as a college student and the tools he sees used by the many blind and visually impaired students on the campus where he is now employed.

"I'm not inclined to take the approach of recalling how I walked uphill both ways to school," he says with a droll chuckle. "If you say to students today 'You have it so easy,' it simply isn't productive. You could say they are coddled, but technology exists today to do things differently and they have access to that advantage. That doesn't make them lazy."

That said, this father of four and grandfather of four does believe that there are relevant trade-offs for the comparative luxury enjoyed by blind students on large campuses today.

Those of us who were students in the 1960 and 1970s, Crabb points out, developed by necessity certain interpersonal skills that are not required for survival today. We bought print copies of our textbooks, ordered the recorded versions from Recording for the Blind and Dyslexic, hired personal readers, and needed to have conversations with our professors about our personal accommodations. In his case, he says, he would ask professors if he could record lectures (listened to later at double speed with speech compression), and would make his own arrangements for test-taking. With a wry laugh, he recalls the time he and the young woman acting as his reader rode up and down in an elevator to complete a test because it was the only spot in the building they could find where talking was permitted!

Because many of the same accommodations are now handled by the Office of Disability Services on his and other large campuses, Crabb believes that students may be missing out on the opportunity to build the interpersonal and self-advocacy skills that are so essential after graduation. He further reflects, however, that technology has had an impact on the entire generation. Text messages and social networks pose a possible danger for all students, he says, of isolation in the dorm room.

"I think that students today should be responsible to the extent that it makes sense with regard to checking on the status of accessible textbooks and other accommodations," he says, "and certainly not just hand over a list of books one day and come back 10 days later to whine that the books aren't ready yet."

The road from journalism to assistive technology director may seem a circuitous one, but Crabb considers all of the stops on his career path to be fitting nicely together. He can't say that he misses writing because he still has plenty of writing to do. He puts together brief tutorials for faculty and staff learning new applications and, in addition to his "day job," is compiling a beginner's handbook on assistive technology for Guiding Eyes in New York, where he trained with his own beloved Golden Retriever/yellow Labrador dog guide.

The list of benefits in his current position is long, in Crabb's view. Not only does he get to satisfy the technology bug that bit him so long ago, he gets to walk past the OSU marching band en route from one technology lab to another.

"I have a real sense of appreciation every day for the young people who surround me," he says with feeling, and then adds with a touch of his characteristic humor, "even the ones who seem to come within an inch of my dog's face with their bicycles!"

Navigating Higher Education with Visual Disabilities

Many years ago, I left the cozy confines of my suburban high school for the rough-and-tumble world of university life in a Midwestern college town. Before classes started, I attended a summer orientation for freshmen to learn the nuances of higher education. Truth be told, I did learn a lot about how to register for classes, which science professors were most popular with university athletes, and how to select the dorm with the best meal plan. At the time, I had not yet learned about my vision loss and therefore did not inquire about services for students with disabilities. For those of you out there who are about to embark on this magical journey yourselves next month, I would like to offer you this informational guide on how to navigate the waters. You might be saying to yourself, "Wait a second; he just said he didn't even know he had vision loss when he went to college! Who does he think he is?" In January of this year, I enrolled in the Executive Masters of Business Administration program at San Francisco State University. As far as the vision loss—well, let's just say there's no controversy these days, and I make regular use of the office for students with disabilities.

Higher Education and Your Rights

In 1973, the U.S. Congress enacted Section 504 of the Rehabilitation Act, which in essence provided people with disabilities the same access to postsecondary education as any other person. According to the U.S. Department of Education, the law reads "No otherwise qualified individual with a disability in the United States … shall, solely by reason of her or his disability, be excluded from the participation in, be denied the benefits of, or be subjected to discrimination under any program or activity receiving federal financial assistance." Title 2 of the 1990 Americans with Disabilities Act expanded the scope of the law to include private institutions, including colleges, universities, and postsecondary vocational education institutions. Both of these laws provide students with disabilities equal access to higher education. Not only are institutions prohibited from discriminating against people with disabilities, they are required to furnish appropriate aides and to make accommodations to provide equal access.

Unlike your educational experience in kindergarten through 12th grade, you should be prepared to be your own best advocate or to enlist the assistance of family and friends to advocate with you. One difference you will notice right away is that you will probably be asked to prove that you have a qualifying disability that is protected by these laws. This might be a form that needs to be completed and signed by a medical doctor, such as an ophthalmologist or low-vision specialist. If you don't have a qualifying disability or cannot have a medical professional confirm your disability, you may not be able to take advantage of the office for students with disabilities, but there are still plenty of options out there to improve your learning experience. In my case, the university had just opened a new campus where the business school classes met, but there was no office for students with disabilities there. I worked with the office to make sure they would be able to furnish me with the necessary accommodations so that I could participate with my classmates. This included access to testing facilities and delivering accessible reading materials as it was not convenient for me to visit the main campus for tests or to pick up materials myself.

What's Available?

If you have already used assistive technology to get to this point, you may already be familiar with many of the resources that are available to you. This includes screen-reading software, screen-magnification software, video magnifiers, notetakers, braille displays, assistive listening devices, and digital book players. If you do not already own assistive technology, your school might be able to provide you with equipment that you may use while you are a student. However, it is important to remember that it is your responsibility to decide which technology will best meet your needs. One great resource is AccessWorld, but of course, you already knew that. Additionally, computer labs and libraries on campus may have assistive technology installed on their machines. Schools also provide notetakers for students unable to take notes in class, and interpreters for people with hearing loss.

Many of your learning materials, such as textbooks and handouts, may be converted to a format that you request, such as large print, accessible PDF, Word document, Braille, or MP3. It is really important to remember that you are in school to concentrate on learning and not to get bogged down in dealing with your technology requirements. During my first semester, I forgot that my portable book reader was not able to read the PDF files for the chapters of my marketing textbooks. For each chapter, I used the "save as text" feature to create text files and read them on my way to and from school on the train. This was one extra step that cost me quite a bit of time as the textbooks had a lot of chapters. When I requested my books for the second semester, I chose a file format other than PDF for that reason. Once you find something that works for you, it is probably best to stick with it. It might also be a good idea to talk to other students to find out what is working well for them. Since the office for students with disabilities is dealing with a large number of students, all of whom are on tight schedules, I cannot emphasize enough how important it is to be prepared and even a bit flexible. If you already have access to your professors' reading lists, it is a good idea to notify your counselor so they can get started on preparing your materials. The office may only be able to provide the first couple weeks' worth of reading, but rest assured they'll supply the text for the balance of the class.

Another option for class reading is to use a reader—an actual human being who can read aloud your textbooks. I know, it seems so old fashioned in today's world full of technology. However, I feel for certain subjects, especially those with charts, graphs, or formulas, you might fare better if somebody is able to describe the key points of the text. In my experience so far, textbooks in courses such as accounting and statistics have not been easy to read with digital files and make more sense when read by another person who can describe the formulas, charts, and graphs in the context of the rest of the chapter.

Unfortunately, there is some bad news when it comes to the accessibility of the websites that accompany many textbooks. Soon you will discover that many textbook companies have added additional videos, audio content, quizzes, practice problems, and study materials online for students to use in addition to their textbooks. It has been my experience that the websites and the supplemental materials are not very accessible. One suggestion is to ask the office for students with disabilities to gather the content and try to make it accessible, but this may not always be possible. For my classes, I was not able to use all of the materials, but I did work with some classmates together at the library. If you find inaccessible materials online, I suggest you contact the textbook company and let them know you are unable to use the site.

Laptop or Notetaker

This is not an easy question to answer and I'll probably receive dozens of angry letters from AccessWorld readers who think I am crazy. I started using screenreaders and laptop computers well before I had ever picked up my first notetaker. For hours and hours, I struggled to learn all the hot keys and shortcuts to use with my screenreader and Microsoft Word, Excel, and Outlook. Because I am studying business, I use Excel every day and it is important to be able to share documents with my classmates. Additionally, having a screen for my sighted colleagues comes in handy, especially if we are working on a group project. All that being said, most laptops take at least a minute or longer to boot up and they have a pretty lousy battery life compared to notetakers.

At the opposite end of the spectrum, notetakers have some great bells and whistles, such as media players, Daisy reading software, notepads, address books, calendars, and calculators. Usually, notetakers boot up instantly and it makes it easy to get to work right away. It is also really convenient to remove the SD or compact flash memory card to transfer files between multiple machines using a card reader. Many notetakers and digital book players include audio recorders and built-in internal microphones that can be used for recording class lectures. It is probably a good idea to ask for the professor's permission before you start recording to avoid an uncomfortable situation. Some professors might be wary of students posting recordings on YouTube, Facebook, or other websites.

Regardless of which direction you choose, always make sure to carry your power adaptor and a USB flash drive for easy transfer of files. Don't forget, your homework this summer before you arrive on campus is to learn how to use your assistive technology with popular software packages such as Microsoft Office. You will be expected to submit assignments and papers either as typed documents or electronic files. Go online and practice your keyboarding skills with one of the typing tutor websites so that you can type quickly during class. I can say without hesitation that all of your classmates will be familiar with using their computers and you'll be able to join in right away if you too are up to speed with technology.

The Campus Experience

Many schools will provide you with a mobility instructor to show you the campus before classes if you ask for this service. Don't think for a second that you should just wing it. Most schools are much larger than your high school campus and usually there are multiple classroom buildings, administrative offices, libraries, dormitories, and recreational facilities. In my experience, campuses are not necessarily planned out in an easy-to-follow grid, so even with orientation, it will probably take a few weeks for you to become very comfortable. Make sure you inquire about the safest routes through school, the location of emergency telephones, and the schedules of campus shuttle services. If you are using a dog guide or plan to have one by the time you start school, you will want to inquire about ideal locations for relieving your dog. Even if you are not using a dog guide, many schools require first-year students to live on campus, so it is a good idea to speak with someone from the housing department to discuss dormitory options.

In the Classroom

One thing that has changed dramatically at schools across the country since I completed my undergraduate degree is the heavy use of online learning environments. You might have professors who post all of their assignments online and expect their students to check in regularly for updates and to submit homework. You should be prepared to go online to download homework and reading assignments. Additionally, your professor will likely post your grades online. The accessibility of these environments will probably vary greatly depending on your school. At San Francisco State University, I am able to log onto iLearn to read class syllabi, download documents, and most significantly, find out the dates of spring break in an accessible environment that works well with my screen-reading software. It is very important for you to communicate with both the professor and the office for students with disabilities to ensure that your professor is posting accessible learning materials. Most schools will offer assistance to professors who are unfamiliar with creating accessible documents.

Because you will probably communicate with your professors and classmates via e-mail, you'll want to know your options. In my experience, many Web-based e-mail programs are not optimized for accessibility and they may be very difficult to use with assistive technology. As this article goes to print, my school has migrated to Microsoft Live mail, but I have not had enough time to judge how well it works with assistive technology. If your school allows students to access e-mail using POP3 or IMAP clients such as Microsoft Outlook or Apple Mail, this could be an option. Additionally, notetakers such as Braille Note, Braille Sense, Pacmate, and the Braille Plus/Levelstar Icon have e-mail clients. I have even heard of students forwarding their school e-mail to their Gmail, Hotmail, or Yahoo accounts.

Finally, there is no shortage of PowerPoint presentations in the college classroom and this is unlikely to bring smiles to the faces of students using assistive technology. PowerPoint presentations are not inherently inaccessible, but if the person creating the slides is not familiar with accessibility, they are liable to prevent assistive technology from accessing the content. There are two alternatives for working with this type of technology. The first alternative is to make sure the professor provides a copy to the office for students with disabilities to be converted to an accessible version so you can follow along during class. The second option is using Serotek's Accessible Event software, which allows you to follow along remotely while your professor goes through the slideshow. You can use this software with your screenreader, Braille display, or make the print larger with screen-magnification software. If you are going to be presenting in class, it is a good idea to become familiar with the techniques so you do not exclude anyone from your presentation. Check with your school's office for students with disabilities for helpful hints for creating accessible documents.

Reading Resources

In addition to having the office for students with disabilities scan your books or request them from the book publisher, I wanted to provide additional resources for finding reading materials on the Internet. Bookshare is a Web-based library that specializes in providing digital files of books and text books. Students can download these files and use a portable device or their personal computer to read them with speech. Bookshare is available to all students with print disabilities. The Internet Archive is a treasure trove of archived digital files, including large book and music collections. The National Library Service for the Blind and Physically Handicapped is a division of the U.S. Library of Congress charged with providing accessible content to people with print disabilities. Through a network of lending libraries, eligible patrons may request various types of content in braille or audio format, including new digital files that use real human voices and allow readers to navigate by various levels. Project Gutenberg is an online depository of more than 30,000 titles that can be read on a variety of devices. For those students who prefer human readers to synthesized speech, Recording for the Blind and Dyslexic offers nearly 60,000 titles for students, including textbooks. If you are having a difficult time finding your books, you may want to try commercial book sites that offer audio, electronic books, and large-print copies, such as Amazon, Audible, or Read How You Want. Although I have not had the chance to sit down and play with any electronic book readers, such as the Amazon Kindle 2, Apple iPad, or Sony Reader, readers might find that these devices may meet their needs. Of the three mentioned, only the Apple iPad has a screenreader for navigating the device and all three have various controls for adjusting font size and color contrast, but proceed with caution. You can read more about the accessibility of e-book readers in Darren Burton's AccessWorldarticle.

What Else You Can Do

Going to a college or other institution of higher learning is a huge step toward independence, and it is really important for individuals to recognize that being independent does not mean doing everything alone. The fact of the matter is that you are going to need the support of your instructors and classmates to pursue your education. It would be really naive of me to think that all students with vision loss are going to be as open and honest as I am advocating, but I do believe it is important to at least consider some of your options. It may not be cool to sit in the front of the class because you cannot see the white board or to use a video magnifier in front of the other students, but remember that you are supposed to be in school to learn and not to win a popularity contest.

I strongly encourage you to sit in the front row, type on your braille notetaker, and ask your instructors to describe the diagram or formula they have written on the white board. Chances are, there will not be a lot of students who have had much experience socializing with people with vision loss. This won't be anything new to you, but I feel that it is important for you to recognize the importance of communicating with your peers. This is a perfect opportunity for you to educate people about vision loss. When I stood up for the first time to introduce myself to my classmates, I asked everyone to introduce themselves to me by letting me know their name and invited everyone to gather around my laptop so I could give them a screenreader demonstration on the Internet. This really made my classmates feel comfortable around me and they asked me all kinds of questions about vision loss and accessing technology.

Staying Social

Like many of your friends from high school, you may be leaving your hometown to attend college. This might be the first time you are going to be away from your family and friends for such a long period of time. Never fear, social websites like Facebook, Twitter, YouTube, and Skype are here. These interactive websites will give you plenty of opportunities to keep in touch with real-time chat, status updates, and of course photos and videos. Plus, all the new people you meet are probably already using these sites, so it's a good idea to brush up over the summer and make sure you are familiar using them. If you are looking to get started with an internship right away, you may want to create a professional profile on LinkedIn and start building your resume. This is the world's largest social networking site dedicated to professionals, and it will help you to develop some of the skills you'll need after school.

Four More Years!

If you are reading this article as you prepare to become a first-year student, get ready to have the time of your life. Higher education is much different than high school. Finally, you'll be able to select your own classes and study subjects that grab your attention. More than likely, you will meet people from all walks of life and maybe even someone from another country. Campus clubs and organizations try to expose students to a variety of cultural viewpoints and you might find yourself completely out of your comfort zone. I encourage you to embrace the experience or learn from it and try something different next time. This is a chance to grow and develop as a person and contribute to the world around you. All of the extra time you spend learning about assistive technology and services offered by the office for students with disabilities will enhance your experience in the long run. Challenge yourself and challenge those around you to realize that vision loss will not prevent you from reaching your goal of an education and a place in society.

AFB CareerConnect Brings Innovation to Training for Teens, Young Adults, Adults, and Professionals

AFB CareerConnect is a part of the American Foundation for the Blind's family of websites. Years ago, the CareerConnect program started as a database of blind or visually impaired individuals from around the country who volunteered to advise and mentor others about the assistive technology they used. All of the individuals were employed in various fields of work.

The mentor-mentee relationship differs for each user. Some users rely on the mentor to find career or technology information. Others may look to their mentors for life guidance to help reach goals. The latter type of relationship often leads to strong bonds that can last for many years. There are instances where mentors have hired their mentees years down the line. Some have become close friends after years of mentoring. It all depends on what the mentee is looking for and how the mentor is willing to assist.

As the database of mentors has grown, so too has the interest in providing quality information and resources on employment, including certain technologies. If you have not visited CareerConnect in a while or fully explored it, you may find some pieces of the career exploration puzzle that you have been missing. Today's CareerConnect is much more then a database of names of visually impaired persons who are employed. The website offers various sections that allow specific audiences to review relevant information. The categories are divided into "For Job Seekers," "For Employers," "For Mentors," "For Professionals," and "For Family & Friends." It boasts search functions that allow users to explore careers, connect with mentors, find up-to-date career details, labor market statistics, job duties, work personality traits, and more. More means there are videos, old-time radio dramas, virtual work sites, message boards, webcasts, National Industries for the Blind job postings, job search resources, interviews, career education activities, articles, and our "Just for Fun" and "Success Stories" series.

CareerConnect has not forgotten about the need for users to search for and connect with our numerous mentors. Not only are keyword searches available, but the search mechanism still allows users to find mentors by their occupation, types of technology used, and state. Because the site allows registered users virtual contact with mentors through a safe messaging system, those users can interact with mentors anonymously if they choose to. This allows users to maintain their privacy. CareerConnect promotes and advocates proper Internet safety because we have many teen users and we want to protect their well-being and the well-being of all of our site visitors.

You must be a registered CareerConnect user to contact mentors (registration is free). However, that is not all you get out of being a user. Registering will give you the ability to fill your "My CareerConnect" folder. You can compile useful tools in it by filling out your personal data sheet, generating a resume, and utilizing the online calendar system and the ability to contact mentors.

Delve into the possibilities by exploring the mentors list on CareerConnect. The site enables you to look for and find profiles that list, if available, a mentor's primary job, vision status, location, job tasks, technology used, former jobs, and current jobs. You can get this info by either doing a generalized keyword search or an advanced search.

Explore the Success Stories webpage, which provides in-depth information through first-person accounts from a number of our exceptional mentors who have reached their employment goals. Their occupations vary from professional body builder to assistant city attorney. There are many success stories to enjoy and contact information is provided for the mentors. These success stories have also proven to be good sources of transition materials for teachers.

Often, people do not get the opportunity to hear about the hobbies or recreational pursuits of adults with visual impairments. CareerConnect put together a series of articles about the mentors and some of the things they do outside of work called Just for Fun! Because research shows that leisure time is something we require as much as food or sleep to stay healthy and sane, we wanted to provide a glimpse into some of the activities that people with vision loss or impairment pursue. Activities in this series vary from jogging to gardening to sky diving.

Humorous, fun, informative, and educational multimedia components have been added to CareerConnect over the past few years. These works can be found in the CareerConnect Multimedia section. There one can find multimedia content for all ages and purposes. Check out the video hosted by Dr. Karen Wolffe about teens in California exploring summer jobs. In addition, you may be interested in listening to Washington state teens interviewing CareerConnect mentors. If you want a good laugh, it is highly suggested that you listen to all of "Aaron's Adventures in Employment." These can be great learning tools for teens or just a great laugh for adults. The issues that "Aaron" encounters are issues that many of us have experienced or seen in the past.

The Aaron's Adventures in Employment series comprises a video and old-time radio dramas, such as "Resume Genie" (building an appropriate resume), "Dress & Impress" (dressing for an interview), "Attack of the Co-workers" (initial experiences with co-workers), "Attitude Adjusters" (first evaluation on the job), and "Aaron's Graduation" (closing the series with a fun look back at all of the adventures with a humorous '80s pop style music video).

In the spirit of "Aaron's Adventures in Employment" comes "College Ready Challenge," styled as an old-time radio drama. This Jeopardy-like game show, where two high school students face off to find out if they are prepared for college by answering questions about the differences between high school and college will appeal to students with vision loss who are thinking about their future. The questions reference the different types of skills, supports, and technology that will be beneficial to success in college or post-secondary training.

CareerConnect has also created some images of what a possible workstation for a person with low vision or no vision might look like in different types of workplaces. These images can be found on the Virtual Work Sites pages and list likely types of technology that might be used in a particular job setting. The newest addition to this is a video of a store vendor who runs his own business and has no vision. He shows the technology he uses to be successful on the job. These virtual worksites and videos are often utilized by individuals to demonstrate to employers what technology someone with vision loss may use on the job. The technology is referenced and links to related information are provided.

NIB CareerNet (CareerNet is used under license from CareerNet, LLC) is the result of a collaborative effort between AFB CareerConnect and the National Industries for the Blind (NIB). NIB has compiled a large list of jobs from around the United States for positions within organizations and businesses associated with industries for the blind. These businesses work in fields related to blindness or have hired persons with visual impairments. The unique feature to this portal is that when you build your resume on CareerConnect and store it, you are then able to submit your resume with one click to participating organizations and apply for those jobs. If you are interested, create your user profile on CareerConnect and get started! This service is provided at no cost to you. Search this job board on CareerConnect to see what is available. You may find your next job there! (If you are not yet familiar with NIB, please check out the organization's website.)

In the spring of 2009, CareerConnect launched a series of professional development webcasts to give professionals the opportunity to stay up to date and earn continuing education credits. Sessions included information on career education, assistive technology, preparing for college, and discussions and tips from successfully employed professionals with vision loss. Thousands of professionals and consumers from around the world logged in to participate in these exciting offerings. These webcasts can be found on the CareerConnect Webcast Presentations page.

One of the most popular parts of AFB's family of websites is the message boards area. Just as there is a message board associated with AccessWorld and technology, there are two message boards associated with CareerConnect. If you are a teenager or know a teen with a visual impairment, we'd like to suggest the TeenConnect message board. TeenConnect can be found within the "For Teens" portal of CareerConnect or through the message board portal on AFB.org. This message board gives teens with visual impairments the chance to discuss the everyday issues they encounter with other teens and young adults. Because minors use TeenConnect, AFB staff closely monitors these pages to ensure the safety and well-being of the users. The teens discuss such topics as issues at school, college preparation, assistive technology, cane versus dog guide, and other fun topics of interest. The other message board sponsored by CareerConnect is Work Life. This message board allows job seekers or people exploring careers to post questions and related information. This message board can be a great forum to ask for career advice.

Professionals and consumers from around the country have expressed their need for new tools to use with career exploration and teaching job-seeking skills. CareerConnect has heard this call and answered it enthusiastically by creating new content for teens, young adults, adults, and professionals. AFB brings new training for teen and adult job seekers through a free online course designed just for them. Participants will have a greater opportunity to prepare themselves through training in basic compensatory skills, self-awareness, career exploration, job seeking, and job maintenance. CareerConnect worked with experts to create content that will provide a unique and effective learning system that is fully accessible. This self-paced course, called the "Job Seeker's Toolkit," fits well into hectic schedules. The "Job Seeker's Toolkit" will allow a professional, parent, or family member to monitor the student/client's progress and comment on the assignments. The assignments are not intended to be busy work. Rather, users will find that the assignments are "tools" that can be used for job searches, college research, and college and scholarship applications.

The "Job Seeker's Toolkit" is uniquely built into registered users' My CareerConnect folders, allowing users to save their assignments or tools for future use or updating. The tools include a cover letter, resume, disclosure statement, ability statement, and numerous reference guides. The "Job Seeker's Toolkit" should be launched in the fall of 2010. Keep watching!

Also under construction for release later this year is "Career Clusters," a new addition that will give users a fresh approach to exploring a large variety of in-demand careers in the current labor market. It will contain pages dedicated to specific information on featured careers and a message board monitored by mentors from that field. Each "cluster" will contain current labor market information on the featured career, links to related articles and resources, and a portal to related mentors. This will be an exciting and user-friendly addition to CareerConnect that we hope will generate lively discussions among users.

In addition, CareerConnect hopes to launch new content designed to address vocational issues faced by teens and young adults, followed by mini lessons that will optimize the use of CareerConnect resources. These mini lessons will allow professionals to work with their students or clients on career exploration while using AFB's great online content.

Register for FREE to be a user of CareerConnect. It takes only minutes and can be a tool for a lifetime. Users have the ability to contact mentors, utilize "My CareerConnect," and other great features. If you are visually impaired or blind and employed, please go to CareerConnect and register to be a mentor. This is so important because you could be a great asset to another young adult, teen, or professional who is trying to be successful in your field or another. It is time to give back and help a new generation to succeed. Being an e-mentor takes very little time and it can make a big difference. Go to CareerConnect and register today!

CareerConnect brings innovation to your career exploration, job search, "edutainment," instructional activities, professional development, mentor searches, e-learning, and more. Come explore and learn about the next generation of career education activities and learning tools on the American Foundation for the Blind's CareerConnect.

Getting Ready to Go Back to School: Assistive Technology Considerations for K-12 Students

As the heat of summer makes some of us long for the cooler days of fall, students, parents, and teachers might begin to think about how assistive technology (AT) can help students. In this article we'll discuss some activities for parents and students that address these issues. A little overview or background information will help us get started.

One of the first things that parents and students can do is acquire some basic knowledge about AT and the assistance it can provide. Technology supplies a wide variety of tools that can be used to accomplish educational tasks. There is no one super tool, or Swiss Army knife, that will assist students in completing all of the tasks required in today's educational programs. Fully sighted students use vision as a tool for acquiring information to accomplish numerous assignments. Students who have impaired vision or no usable vision will need multiple tools to access the information necessary to complete these assignments. One way to think of this is that the student will need a full set of tools to be successful. Some of the low-tech tools available, such as bold-lined paper, felt-tipped pens, slate and stylus, and the abacus may already be in the student's toolbox. But, there may be some high-tech tools available that parents, students, and teachers are not aware of that would be of great assistance. One resource that you might want to investigate is a book titled Assistive Technology for Students Who are Blind or Visually Impaired: A Guide to Assessment.

The objective is to fill the toolbox with the right tools for the job. No matter how wonderful a piece of technology may be, it may not be the best tool for a particular student to accomplish a particular task. The toolbox will be filled gradually as tools are found that allow the student to accomplish desired tasks. Some tools will be used immediately while others will not be needed until that student reaches higher grades. However, the student will need training on the use of some tools a year or two before being expected to use them independently.

Regardless of age or degree of vision loss, students will need tools that allow them to complete tasks in three broad areas: accessing printed information, accessing electronic information, and producing written communication. Technologies exist that allow students to accomplish these tasks visually, tactilely, and aurally. Some allow the user to access information through more than one sense. For example, specialized scanning systems designed to access printed text using a computer can be configured to display the information in the user's desired font and point size on the computer's monitor while simultaneously providing auditory access through synthesized speech. Another example is an accessible PDA (braille notetaker) with a refreshable braille display that can provide tactile access to electronic information with simultaneous access via synthesized speech. The key is to find the tools that allow the student to accomplish the desired task.

The question becomes how does one know what is the right tool for the job? Unfortunately there is not a simple answer to this question. There are so many great technology tools available that it may be difficult to decide which tools should be in the toolbox. Often parents and students are "wowed" by technologies and think this is the answer. In some cases, I've seen parents insist on the school providing product "X" or product "Y." The school purchases the technology but within six months, it ends up in a closet. This is usually due to the fact that the technology, although wonderful, was not a good match for the student and the tasks that he/she needs to accomplish.

Determining the right tool for the job is a process implemented over time. There are several steps in this process that a parent or a student can initiate to get things started. The process starts with determining the student's primary and secondary learning and literacy media: tactile, visual, auditory. This can be accomplished by requesting that the student's teacher of the visually impaired conduct a learning media assessment. If the student's primary or secondary learning media is visual then the next step is to obtain a clinical low-vision evaluation. The clinical low-vision evaluation will ensure that the student has the best combination of glasses or contact lenses that will allow the student to use his or her remaining vision to its fullest potential. It is important that a student use the prescribed optical system when trying to determine his or her AT needs. Additional information that may be helpful is a medical eye report, a functional vision evaluation, and any psychological or educational evaluations of the student. If the student has any additional disabilities, information about the student's abilities and needs in these areas would be helpful. If reports of these assessments are not in a student's file, then the teacher of the visually impaired student should be contacted to request the assessments.

A general guideline for determining AT needs is the SETT framework. SETT stands for student, environment, task, and tools. We've talked a bit about each of these, but now let's see how they might all work together. Gathering background information from various reports and assessments can give us valuable information about the student and his or her abilities. Determining the environments in which the student will be asked to complete certain tasks (classroom, media center, homework, etc.) will allow us to consider the visual, tactile, and auditory factors that may influence the effectiveness of various technologies. The tasks to be completed will most likely fall into one of the three categories mentioned above. Finally, we'll want to consider the tools that fit the student, work in the necessary environments, and allow the student to accomplish the tasks using his or her primary or secondary learning and literacy media.

The guidelines and suggestions discussed above are the basic components of an assistive technology evaluation. It is this author's opinion that this is the place to start. It may be that some of these issues have already been addressed or it may be that we're starting at the beginning. Regardless of where the student is on this continuum, the basic guidelines must be addressed to provide the student with the opportunity to learn and use technology tools to complete tasks in his or her educational program. The next step is to request an AT evaluation.

It may be that you cannot get in contact with the teacher of the visually impaired during the summer. Most teachers return to work a week or two before students return to school, so try contacting the teacher then to make the above requests.

Now, let's take a look at what students and parents can do over the summer to improve a student's use of AT. I'll make several suggestions that I think will be helpful. Not all of the suggestions will be appropriate for all students, so pick the ones that seem most applicable.

  • Read, read, read!!! Probably the best thing that a student can do in the summer is read. The topic doesn't matter. The practice of braille, print, or auditory reading will help students to improve reading speed, vocabulary, and comprehension, which will allow them to take better advantage of the benefits of AT.
  • Practice with optical devices. If the student has a near or distance optical device recommended in his or her low-vision evaluation, then have him or her use it as much as possible. This doesn't have to be school work. Use a magnifier to look at bugs, flowers, or any small detail of interest. Use a handheld telescope/monocular to look at signs, pedestrians, cars, etc., while riding in the car.
  • Type, type, type!!! If the student has started developing keyboarding skills, then practicing to improve speed and accuracy is a great activity. Good keyboarding skills are essential if one is going to take full advantage of opportunities offered by many forms of AT. Try keeping a daily journal. Typing a little bit every day will be beneficial, even if the student simply lists the activities he or she did that day: "Woke up at 8:30, ate breakfast, walked the dog."
  • One other good summer activity is to have students and parents talk about the upcoming school year and answer some basic questions. What classes will the student have? Which ones might present difficulties for accessing printed handouts, information on the board, presentations, etc.? What tools does the student have to help in these situations? You may not know all the answers to these types of questions, but the idea is to start thinking about them and possible solutions. Then talk with the student about how he or she will communicate with teachers and the alternative tools he or she might use. It is a good idea to do some role playing on this topic. A parent can play the role of the teacher and the student can practice explaining his or her needs and ideas in a courteous way that implies independence on the part of the student and a willingness to work with the teacher to ensure a harmonious interaction. In other words, advocate politely but firmly.

Being prepared, proactive, and respectful can increase a student's chances of being successful at integrating AT into his or her K-12 educational program.

Educational Resources and Tips from AFB's Information and Referral Center

The American Foundation for the Blind's Information and Referral Center receives over 250 inquiries every month related to vision loss. Tara Annis, AFB's information and referral specialist, answers these inquiries, which come from people with visual impairments, their family and friends, teachers, social workers, medical and rehabilitation professionals, employers, high school and college students conducting research, and the general public.

The questions cover a broad range of topics, including locating services for people who are blind or visually impaired, assistive technology and daily living products, assisting parents of visually impaired children, books in alternative formats, and assisting seniors who are losing vision as they age.

Tara has a wealth of experience in the field of vision loss, due in part to the fact she has been legally blind her entire life. When she was younger, her visual acuity was around 20/200 to 20/400, and she was considered to have low vision. At that time, she used her limited vision and magnification aids to accomplish tasks. As her vision decreased during high school, she learned non-visual techniques, such as braille and how to use a screenreader.

Tara graduated from Marshall University in 2006 with a Bachelor of Science degree in biology. During her college years, she was employed by the Department of Chemistry's Computing Center as an online course designer and traveled for a summer internship at the University of Rochester to work in a genomics lab, studying how diabetes affected the activity of specific genes.

Since her hiring by AFB, Tara has learned even more about assistive technology and has aided AccessWorld authors by helping to test the accessibility of cell phones, notetakers, and GPS software for cell phones.

Because of her broad knowledge and experience, I asked Tara to pull together a list of her most frequently asked questions (FAQs) related to the pursuit of higher education. She agreed, saying, "I would love to share my expertise and knowledge of available resources with as many visually impaired students as possible in the hope they can learn how to adapt their education to meet their unique situation." Although the information Tara provided is geared toward high school and college students, parents, teachers, administrators, and rehabilitation counselors will benefit from the material as well.

FAQs from the Desk of AFB's Information and Referral Specialist

Question: What should I tell my instructors about my visual impairment?

Answer: It is important to speak with your instructors as soon as you know you are going to be in their class. Many students with vision loss fear speaking to their instructors, worrying he or she will not believe they can complete the course work due to ignorance about the capabilities of people with vision loss.

Try to schedule meetings with all of your instructors as soon as possible. It is best if you talk about your vision loss openly and honestly. Instructors may fear asking questions, not wanting to offend you. As a student, you have to be proactive, explaining how you accomplish tasks. It may be beneficial to bring your assistive technology and adaptive products to this meeting, explaining how these devices will help you. For example, you could say something to the effect of, "This is my laptop with screen-magnification software, and this is an electronic magnifier. When I place the textbook under the camera, all of the material is enlarged. I have some usable vision, so I am able to read the textbook, complete written work, and view the syllabus using this equipment. Using my laptop's screen magnification software, I am able to write term papers and use the Internet to conduct research. I wanted to show you this equipment in order to assure you I can handle the material in this class and I am serious about doing well."

You could also direct your instructor to AFB's website and to other websites on vision loss if he or she would like further information. You should then ask for an overview of the class structure. Will he or she write on the board or use an overhead projector? Will he or she use PowerPoint slides or hand out a good deal of printed material? Will there be in-class assignments or pop quizzes? What is the structure of tests? Will there be off-campus field trips? Knowing answers to these types of questions will help you to better prepare for the class.

Question: What types of services does a Disabled Student Services (DSS) office offer?

Answer: Most colleges have a DSS office, which can vary from school to school in the scope of services offered. The DSS office may offer people to assist with taking notes in class, personal readers, proctors for tests, or someone to assist you in a science lab. However, personal assistants are sometimes in short supply or are not skilled in the material covered in your particular class. This is especially true for subjects such as music, science, math, and higher levels of every subject, where technical terms are commonplace.

The DSS office may also have some assistive technology for loan, such as braille notetakers or video magnifiers. The DSS office can also assist with legal matters, such as if a student is experiencing discrimination. They may also be able to transcribe textbooks into large print or braille, or make tactile diagrams.

In addition to the DSS office, many college departments have hired graduate or teaching assistants who offer student support as part of their job description. You may also want to check with your school's tutoring center. Many tutors are willing to serve as a reader rather than as an actual tutor.

You may choose to find someone on your own and pay for their services. Sometimes the vocational rehabilitation department in your state will give you a stipend for readers. You can advertise for help in the school newspaper, at the career services center, and on bulletin boards in dorms and other places on campus. You may also want to seek help from volunteer groups, such as local places of worship, the local Lion's Club, women's groups, and campus service fraternities.

Question: Where can I get textbooks in alternate formats?

Answer:American Printing House for the Blind offers the Louis Database, where you can search for agencies that carry your textbooks in alternate formats. Recordings for the Blind and Dyslexic offers textbooks from preschool to the doctoral level. You can get them on audio cassette or the Daisy format, which works with Daisy audio book players.

The Bookshare website offers textbooks for primary, secondary, undergraduate, and post-graduate study. Recently, Bookshare began offering students with documented legal blindness free access to its collection, waiving the usual $150 fee.

Project Gutenberg offers a smaller collection of books, mostly classics, which could come in handy for students taking a literature or classics class.

Many works of literature, especially classic short stories and poems, can be found using a search engine. While in college, I was able to locate online versions of pieces such as "The Raven" by Edgar Allen Poe, "Stopping by Woods on a Snowy Evening" by Robert Frost, and "To Build a Fire" by Jack London.

The Library of Congress is another great place to search for novels and poetry for your English classes. You can find audio cassettes, braille-ready electronic files, and digital audio versions of the works you need.

You can also purchase the print copy of a textbook, and scan them yourself using optical character recognition software, such as Openbook or Kurzweil. Even if you cannot locate a particular textbook, check for earlier editions; usually the changes from edition to edition are minimal.

You can even order a completely different textbook on the same subject. I have done this for Physics classes as most general physics books cover the same topics. I could look up something such as "calculating velocity" and learn the same material as my classmates. I have even searched the Internet for topics covered in my textbooks, such as locating boiling and melting points for chemical compounds.

You could also contact the book's publisher and request an electronic version, which, by law, the publisher should send you. This process, however, can be time consuming as you sometimes must verify your disability. So, attempt to find the names of textbooks you will be using during the upcoming school tern as early as possible.

Question: How do I take notes in class?

Answer: Several methods may be employed. You may choose to use a personal notetaker employed by the DSS office or ask a classmate to take notes for you. You could also use a laptop or electronic notetaker. Students with low vision can use a portable video magnifier. You could use 20/20 pens, which create a bold line. You could also try using bold or raised-line paper. Another method is using an audio recorder, either a separate piece of hardware, or one that is built into your laptop or electronic notetaker.

Question: How do I complete in-class work, such as pop quizzes or worksheets?

Answer: You can handle in-class work in several ways. If the assignment or quiz is short, you can stay after class and have the instructor read it to you. The instructor may allow you to use an electronic version on your laptop or notetaker. Be sure to bring your portable video magnifier to class if you have enough usable vision to take assignments and quizzes in this manner. Some people with vision loss, even though they cannot read print, learn the print alphabet, allowing them to use raised-line paper for short assignments. I've done this for short multiple-choice quizzes.

Question: How do I handle taking tests?

Answer: You could contact the DSS office and use one of the office's personal readers. Some DSS offices will transcribe tests into braille, convert them to electronic format, or reproduce them in large print. Another option is using a video magnifier if you have enough usable vision. Many low-vision students have difficulty reading Scantron sheets, and choose to write directly on the test itself or on a separate sheet of paper. Some instructors will give a visually impaired student the test on a USB drive or via e-mail, allowing him or her to use a laptop or notetaker to answer the questions. This is especially handy for essay questions, which can be difficult to answer by dictating to a proctor or writing under a video magnifier.

Question: What about classes of a more visual nature, such as those in the fields of science, engineering, and math?

Answer: Several agencies have created adapted products for the science, technology, engineering, and math fields, including braille and large-print periodic tables of the elements; raised-line drawings of the human body systems; talking and large-font calculators; raised- and bold-line graphing paper; large-print and braille rulers, yardsticks, and tape measures; braille protractors, 3-D representations of shapes for geometry, and raised-line drawing kits.

The color video magnifier is great for viewing specimens, such as the veins on leaves, the wings of insects, and details on rocks and shells. You can label lab equipment, such as measurement marks on beakers and test tubes, with large-print or tactile labels, allowing you to perform lab experiments using this glassware independently. Some lab work may not have a logical way to be performed independently. For these circumstances, students who are visually impaired may choose to use a lab assistant. The instructor knows the student with vision loss is responsible for telling the assistant what to do, such as stating the amount and type of compound to pour into a beaker. The assistant may also describe color changes, temperature readings on the thermometer, and weights on the balance scale. The lab assistant does not write lab reports, take tests, or do any of the written work submitted for the course. This is the responsibility of the student.

Some adaptive lab equipment is also available, such as talking thermometers, voltmeters, micrometers, color identifiers, and balance scales. The Independent Laboratory Access for the Blind project is one source for such equipment. Some microscopes have the ability to connect to a monitor, displaying specimens under the microscope lens onto the monitor's screen. This allows for much larger magnification and eliminates the need for the student with low vision to focus the microscope lens by looking through the lens, which can be quite an eye strain.

Question: What if I do not have the funds to purchase assistive technology?

Answer: The vocational rehabilitation department in your state may purchase assistive technology, such as video magnifiers, electronic notetakers, or laptops. Your school or a local public library may have an assistive technology room for visually impaired students to use. Check with local agencies for the blind or teachers of the visually impaired to see if you can borrow equipment.

Community groups, such as the Lions Club, may offer grants. The National Federation of the Blind (NFB) has implemented a technology loan program with a low interest rate, and the Association of Blind Citizens (ABC) offers an assistive technology fund.

The following organizations distribute low-cost computers with adaptive technology, either a screenreader or screen magnifier, included:

Texas Center for the Visually Challenged
11330 Quail Run
Dallas, Texas 75238
Phone: 214-340-6328
Fax: 972-495-5344
E-mail: boblang@airmail.net

The Used Low Vision Store offers myriad assistive technology for a reduced cost.

Question: Where should I look for scholarships?

Answer: There are a vast number of scholarships for college students, and some are geared specifically for persons with vision loss. Check with local and national agencies for the blind, such as the NFB and the American Council of the Blind chapters. Also, note that AFB offers scholarships to students pursuing higher education; visit our website to learn more.

Question: Where on the AFB website can I find useful information about college-related issues?

Answer: You can use the search option on our main site to locate information, or browse the FamilyConnect website, which has a section specific to college students under the "transition to independence" link. Here you can read articles such as "Caitlin's Top Ten Rules for Incoming Freshman" and "College Life Begins."

Our CareerConnect website also contains a wealth of information about employment. At first glance, this content may not seem suitable for persons pursuing an education (as opposed for those looking for careers), but the mentor database in particular will be of great assistance. I know from personal experience because I located mentors in the science fields, specifically chemistry, physics, and biology, in order to ask questions about adapting laboratory material. So, please take time to review the AFB main website, FamilyConnect, and CareerConnect. Great information is literally at your fingertips!

A Review of Window-Eyes Classroom Training

When the postcard arrived in the mail, it caught my attention. Braille and print on the same card is still atypical enough that, for those of us whose literacy is centered on braille, it is remembered. The news conveyed was that GW Micro would be hosting a series of training sessions around the country, classes designed to put more of the power of the popular Window-Eyes screenreader into the hands of its users.

Learning to use any computer and its various applications is a challenge for anyone, but for users who are blind or visually impaired, the learning curve is particularly steep. Let's begin with a basic computer with a Windows 2000 or higher operating system. Although every computer user requires time to learn how to navigate the screen and manipulate specific applications, the blind or low-vision user immediately requires a second layer of complexity, a screen-reading or screen-magnification program to make accessing that Windows operating system possible. Whereas the sighted user has myriad visual prompts—icons, pop-up menus, and both text and graphic instruction at every turn—the blind user needs to learn keystroke workarounds to take advantage of the same design features.

Individual learning styles vary. Some blind users read manuals (in whatever format they happen to be provided) from cover to cover. Others jump with daring into the middle of a new application, hoping no serious crashes will occur while they poke around, trying to determine which keystroke might accomplish which task.

Users of assistive technology have never had the advantage of local retail outlets where "test drives" of computer products might occur. And, once the products are purchased, the blind user can't go to a computer class at the local high school, college, or computer store for basic training. In an attempt to level the playing field once again, GW Micro launched the idea seven or eight years ago of bringing training sessions to customers.

In 2008, the decision was made to step up the pace. Since early 2009, the company has offered at least two training sessions a month, holding classes in cities across the country, from New York to Sacramento, Jacksonville to Chicago, and a host of others along the way. About a dozen more are planned before the end of 2010. Classes range in size from four to 10 students. We at AccessWorld thought it would be interesting to share with readers how these classes are conducted, so when one came to a facility near me—Clovernook Center for the Blind in Cincinnati—I attended.

The training was a two-day session, running from 8:30 to 4:00, with a few short breaks and time out for lunch. Trainers were Jeremy Curry, GW Micro's director of training, and Marc Solomon, regional sales manager. In our class seven students were already using Window-Eyes, ranging from veteran users of a decade or more to periodic users with a reasonable level of comfort with the product. Five were blind or low-vision users, whereas two were sighted teachers of visually impaired students. Three came from other towns, 60 to 70 miles away, and one had flown from Phoenix to Cincinnati to participate. Clearly, customers feel there is a need for this kind of focused training.

We were instructed beforehand not to bring our own computers, an approach whose merit became instantly clear. All work stations were identical, configured by the trainers prior to our arrival to maximize learning time and minimize the time that might otherwise have been devoted to tweaking and trouble-shooting. Until a year or so ago, the company allowed students to bring their own computers or had work stations set up by the host facility. So much valuable training time was lost trouble-shooting and configuring personal systems to enable students to follow instruction efficiently, however, that the decision was made to provide all work stations and configure them identically before students arrive. Ten netbooks running Windows XP and 10 running Windows 7 are now allocated for training purposes. In our class, each student's workstation was essentially identical: a netbook with a full QWERTY keyboard attached and a set of headphones. Each netbook was running Windows XP with Window-Eyes 7.2 and Office 2007. I had alerted the trainers beforehand to my personal dependency on braille and my wish to bring my own braille display. They were extremely accommodating on this point and even pointed out features specific to braille from time to time.

The first step was to instruct the group on setting speech parameters—volume, rate, pitch, and tone—to personal preferences. Thus, by using headphones, each student was able to work in a speech environment that was comfortable and no one had the distraction of listening to a babbling chorus of atonal speech synthesizers. The space used was a conference room in a rehabilitation facility, and was consequently quiet, acoustically friendly, and well suited to a relaxed teaching environment.

During introductions, each student was asked to name one application or feature he or she desired to learn or become more proficient in during the training. A concerted effort was made to cover all of the areas mentioned and, when time constraints made it difficult, the group voted on which of two applications was most needed.

Jeremy Curry and Marc Solomon made for a perfect combination of lively and informative training. Jeremy is visually impaired and, of course, a stellar user of the Window-Eyes product. The majority of his teaching throughout the two intensive days of the course was done without consulting notes or his own computer. His teaching style flowed smoothly from one point to another, always pausing patiently for questions and never losing the momentum of the particular task being addressed. Marc Solomon, who is sighted, knows the product intimately and complemented Jeremy's relaxed, easy manner wonderfully with a high-energy approach.

During the two-day course, using the power of Window-Eyes in Microsoft Word, Excel, and Outlook was covered, as was the navigation of webpages, forms, and other online material. Along the way, countless tips and tricks combining Windows' own commands with Window-Eyes' special features were explained. Using the mouse from the keyboard was a concept that drew particular delight from everyone around the table, as was the exercise highlighting the GW Micro Script Central page. Script Central is a collection of some 200 Window-Eyes scripts, written mostly by blind users of the product, that can be downloaded free of charge from the GW Micro website. Scripts range from frivolous and fun to impressively powerful programs (checking weather forecasts, for instance, to enhancing navigation in a Microsoft Word document) and, once shown the simple steps to doing so, can be easily installed by any user.

The respect for individual learning styles was a particularly significant ingredient in the success of the training. Two students were fully sighted, two low vision, and three totally blind. Some were veteran computer users, whereas others were more moderately experienced. Some were long-time Window-Eyes users who had come to acquire more advanced techniques, whereas others had only used the product sporadically. At all times throughout the course, students were kept at the same pace and on the same page, so to speak, working through exercises simultaneously. If a student fell behind or was "stuck" in a computer glitch, one trainer or the other immediately rushed to the aid of that individual, patiently offering one-on-one instruction to bring the student back on track.

Because so many blind and low-vision users are essentially self taught, there was often a celebrated "aha" moment when the instructors illustrated a particularly efficient shortcut to accomplish a familiar task. Setting place markers to return to a familiar point on a webpage, for instance, elicited such a response in more than one person, and discovering the simplicity of using the Window-Eyes mouse pointer to explore all text on a screen met with unanimous pleasure.

At regular intervals, the instructors would stop to review, seeking input from each member of the class to be sure that material was being absorbed. Whether one's mission is to sing an aria or build a budget worksheet in Microsoft Excel, it is one thing to know how to accomplish the task and quite another to break that task into consecutive steps and impart the information to others in a manner that is both effective and engaging. I have observed many a technical guru—both in the mainstream and in the field of assistive technology—who could personally perform something akin to magic at a computer keyboard but whose ability to pass on that knowledge to another was weak at best. Not every "techie," in other words, has the ability to teach! A successful learning experience is the result of time spent beforehand by the presenter to organize material, breaking sometimes complex techniques into smaller components, accompanied by a gift for teaching the material. Both elements were clearly present in the Window-Eyes training. Techniques used in each application began simply and grew from the foundation. Keystrokes that required memorization were repeated often enough to enable students to recall them but not often enough to lose attention or momentum. Of perhaps even greater significance, all information throughout the two-day course was imparted with patience and respect.

At training's end, each student receives two CDs covering all material included in the course (one for basic, the other for intermediate), along with a spiral-bound braille summary of Window-Eyes hot keys and instruction on using the Window-Eyes manual. A certificate of completion bearing the student's name, also in both print and braille, is given to each member of the class.

Because the training is only two days long, no single application is covered in depth. The certificates awarded to each student upon completion indicate achievement in Window-Eyes basic and intermediate skills. I asked Jeremy Curry whether the company has considered an advanced course. At this time, there are only two training courses offered: the two-day training described in this article and a scripts-writing course for those individuals interested in that singular skill. Customized trainings have also been designed to meet the specific needs of organizations, focusing, for example, on the use of Window-Eyes with a particular application, such as Outlook or Excel. Because the most frequent comment regarding improvement of the course on evaluations has been to extend the training to three days, GW Micro is exploring that option with a three-day pilot in Oregon in September.

The description of training on the GW Micro website indicates that one day will be devoted to basic training and the other to intermediate. It further indicates that training will cover basic functions of the Windows operating system, Window-Eyes itself, Microsoft Office applications, Internet Explorer, and Mozilla Firefox. It cautions that class composition and time constraints will determine the degree to which all of the above are covered. In our particular class, for example, PowerPoint was not addressed. When we were well into the second day, however, and this became evident, Jeremy Curry asked whether we would rather focus on the Outlook calendar or PowerPoint. The unanimous vote was for Outlook. We did not address Firefox, either; this may well have been because, upon polling students during introductions, everyone present was using Internet Explorer.

The cost for the training is $325 per day, with an option to attend only one day if desired. Throughout our two-day training, sighted and blind users alike discovered features and concepts they had not previously known existed in Windows itself as well as in the various applications addressed. All were clearly pleased and impressed with the training received, expressing gratitude to the trainers as belongings were packed and departures made. If, in other words, the absence of a few elements covered was the trade for the constant effort to keep everyone moving forward and working in concert, it was a wise trade indeed. Talented teachers, organized material, and constant reinforcements to ensure that everyone was on the same page added up to a two-day training that was well worth the time and money spent.

For More Information

Upcoming GW Micro Window-Eyes trainings are scheduled for Little Rock, Atlanta, and Portland. Upcoming scripts training classes are planned in Dallas, Atlanta, and New York. GW Micro also conducts two-hour telephone trainings for $168 per session, concentrating on specific applications such as Window-Eyes with MS Excel, Window-Eyes with Outlook, or using Window-Eyes to navigate the Internet. For more information or to register, visit the GW Micro training website or call 260-489-3671.

A Review of the Eye-Pal SOLO and Eye-Pal SOLO LV from ABiSee, Inc.

The Eye-Pal SOLO and Eye-Pal SOLO LV from ABiSee, Inc., offer a standalone solution for reading documents by providing a single unit that can scan print documents and speak text aloud in a matter of seconds. The Eye-Pal SOLO, a product for people who are blind, and the Eye-Pal SOLO LV, a product for those with low vision, are physically identical products. However, they differ functionally in one way: the Eye-Pal SOLO LV offers additional low-vision access by providing very basic video magnifier functionality.

A photo of the Eye-Pal SOLO

Caption: The Eye-Pal SOLO

A photo of the Eye-Pal SOLO LV with a monitor displaying magnified text in high contrast colors.

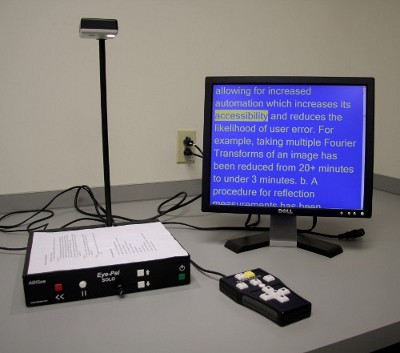
Caption: The Eye-Pal SOLO LV

Documentation

The Eye-Pal SOLO and SOLO LV come with an easy-to-understand 16-page user manual and a four-page quick reference sheet that explains the controls.

Both user manuals are printed in 12-point Arial font. The quick reference for the Eye-Pal SOLO is printed in 14-point Arial, and the Quick Reference for the Eye-Pal SOLO LV uses 12-point Arial. These font sizes are too small for most people with low vision to read. The American Printing House for the Blind recommends at least an 18-point font for those with low vision. Therefore, having larger print documentation would not only be helpful, but expected for these products. The user manuals' spiral binding, however, does allow the booklets to lie flat, making them easier to use with hand-held or video magnifier systems.

A PDF version of the Eye-Pal SOLO LV user manual, but not the quick reference guide, can be found on the ABiSee website. Although the electronic documentation is an option for users who wish to use screen magnification software to read the manual, the orientation of the online Eye-Pal SOLO LV user manual can be confusing. The pages of the PDF are organized irregularly, meaning that instead of going in chronological order from page 1 to page 16, the manual has the pages in this order: 16, 1, 2, 15, 14, 3, 4, 13, 12, 5, 6, 11, 10, 7, 8, and 9.

The Eye-Pal SOLO LV online manual is unfortunately inaccessible to screenreaders and the screen-reading features of popular screen-magnification programs. In addition, neither the quick reference guide nor the user manual for the Eye-Pal SOLO is available on the ABiSee website. This needs to be changed immediately as all documentation should be accessible to the end users of these products.

One useful resource that is available for users on the ABiSee website is a series of video tutorials for the Eye-Pal SOLO and SOLO LV. These videos cover how to set up and control the two devices and provide nearly all of the information contained in the user manuals.

Physical Description and Controls

Straight out of the box, the Eye-Pal SOLO and SOLO LV consist of a single black rectangular unit that serves as the base, a neck camera that attaches to the base and takes images of the document, and a keypad control used in addition to, or as a replacement for, the buttons on the front of the device. The Eye-Pal SOLO and SOLO LV pull out of the box easily and are essentially ready to use after attaching the neck camera to the base and plugging the device in. The neck is designed so it can only be inserted in one direction, and it snaps into place, making for easy assembly. Neither the Eye-Pal SOLO nor Eye-Pal SOLO LV comes with a monitor, although both provide support for monitors to display the scanned text, and in the case of the SOLO LV, to magnify objects placed under its camera. The Eye-Pal SOLO has a VGA port on the back of the device that can be used to connect to any basic computer monitor.

The top of the rectangular base is used as the scanning surface for the Eye-Pal SOLO. A document is placed on the surface over the ABiSee logo, and after it has been situated, the neck camera will automatically take an image of the document and convert its text to speech. The direction or orientation of the document does not matter—as long as it is placed flat on the scanning area, the Eye-Pal SOLO will be able to convert the document to speech.

The Eye-Pal SOLO and SOLO LV can be controlled using three different interfaces: there are buttons located on the front panel of the base, there is an external keypad with multiple function buttons, and the Eye-Pal SOLO introduces a new method of control: hand gestures.

Front Panel Interface

The controls along the front panel of the device are distinguishable from one another both visually and by touch. Additionally, the Eye-Pal SOLO provides spoken feedback after any button press, and no button, if accidentally pressed, would irreparably disrupt your reading. The controls comprise four square buttons, one circular button, and a dial, all of which physically protrude from the device and are color-coded for help with identification. Additionally, each button has an icon beside it to indicate its function.

Starting with the button at the far left is a red square button that can be used to read the previous sentence. This is the only button on the front of the device that allows you to navigate the scanned text, and it only allows you to move backwards one sentence at a time. This button can be pressed as many times as necessary to return to a specific sentence. Additional functionality for navigating the text, including moving forward and backward or word by word, is possible when using the keypad interface.

To the right of the "read previous sentence" button is a white circular button, which is used to pause or resume reading. The speech output can be paused mid-sentence, and when resumed, the reading will pick up immediately where it left off. Additionally, this circular white button also allows one to use hand gestures for controls. When this button is held down for three seconds, the Eye-Pal SOLO will inform you that motion controls have been activated.

Next to the "pause/resume reading" button is a dial that can be used to control speaker volume. This will affect the volume of both speakers inside the Eye-Pal SOLO and any headphones that are attached via the headphone port. Located next to the volume dial are two vertically aligned white square buttons. These can be used to control the reading speed of the Eye-Pal; pressing the top button will increase the reading speed, while pressing the bottom button will decrease it. The variance in speed is a welcome feature, with a wide range between the slowest and fastest reading speeds.

The green square button on the far right is the power button. The Eye-Pal SOLO can be kept on for long periods of time, but when first turning on the device, it typically takes about a minute to warm up and start speaking.

Keypad Interface

The Eye-Pal SOLO's keypad interface attaches to the base through a USB port on the back of the unit. Setting up the keypad is quick and simple, as it requires no further installation than plugging it into the Eye-Pal SOLO. The keypad offers a number of additional functions that cannot be accessed through the front panel; the pad is necessary if you wish to use the more advanced features of the Eye-Pal SOLO and SOLO LV.

The keypads differ slightly for the Eye-Pal SOLO and SOLO LV, as the keypad for the SOLO LV has three additional buttons to control its magnification functions. Otherwise, the keypads for the two devices are identical; they both have a rectangular shape and use large tactile buttons with protruding icons that help to identify the different buttons.

Starting with the group of buttons on the bottom of the keypad is a directional pad comprising four arrow keys with a "pause/resume" button in the middle. The pause/resume button on the keypad has a function identical to the pause/resume button on the front of the device. The arrow keys allow one to navigate the scanned text and use some of the more advanced reading features.

The left and right keys can be used to move forward and backwards in the text word by word, whereas the up and down keys are used to move sentence by sentence. This makes it easy to move around the document and control one's focus. Unfortunately, moving on a larger scale, such as moving between headers, paragraphs, or pages, is not possible with the Eye-Pal SOLO. This can make it cumbersome to use with longer documents when you need to get to a specific point deep in the text.

The arrow keys can also be used to activate some helpful features. Pressing the up and down arrows simultaneously will cause the Eye-Pal to describe the layout of the scanned document, including the number of headers and total word count. Although this is a welcome and helpful feature, the Eye-Pal sometimes provided perplexing layout information, including awkward identification of headers and once informing us that a page contained "122 percent text."

The Eye-Pal SOLO is designed to detect columns automatically and adjust the optical character recognition (OCR) settings accordingly, but the option to read through columns can be set manually by pressing the left and right arrows simultaneously. This is a more advanced feature that will likely not be needed by most users.

Directly above the directional pad is the "help" button, which is also the only round button on the keypad. Holding down the help button will provide the user with audio instructions on how to use the keypad to control the Eye-Pal SOLO. Additionally, holding down the help button while pressing any other button on the keypad will provide a spoken description of the button and its function(s).

Above the help button are the "save" and "recall" buttons, which allow the user to save up to 4 one-page documents to the Eye-Pal SOLO that can be loaded at any time. The process for saving documents is straightforward: hold down the save button and press one of the four arrow buttons. The device will let you know the file has been saved successfully by saying the words "image saved." When you wish to recall a saved document, you hold down the recall button and press the same arrow button. One document can be saved to each arrow button.

This covers all of the buttons on the keypad for the Eye-Pal SOLO, but unique to the keypad for Eye-Pal SOLO LV are three additional buttons used to control magnification functions. These additional features require a monitor to be attached to the base.

In between the save and recall buttons is a "mode" button, which is used to switch between reading mode and magnification mode. When you press the mode button, the Solo LV will tell you which mode you are in—either reading mode or magnification mode. In reading mode, the monitor will display the text of the scanned document, and in magnification mode, the monitor will display a magnified view of the area directly underneath the camera.

Directly above the mode button are the "color" and "zoom" buttons, which can be used to adjust the display in both reading and magnification modes. When in reading mode, these buttons change the appearance of the scanned text, allowing you to increase the size and color of the text and its background. In this setting, there are 14 levels of zoom and 12 high-contrast color settings. When in magnification mode, these buttons change the appearance of the magnified area. In this setting, there are four levels of zoom and 14 high-contrast color settings.

The zoom and color settings for the Eye-Pal SOLO LV are on a loop. For instance, pressing the zoom button will cause the Eye-Pal SOLO to increase zoom until you reach the maximum level, after which pressing the zoom button will take you back to the lowest level. There is no way to go back a level for zoom or color settings other than by cycling through all of the options. This can make it difficult to find the ideal settings without having to go through all of the zoom and color settings multiple times. Once you have found a zoom and color combination that works for you, this will likely no longer be an issue, but getting to that point may take a few tries.

Motion-Activated Interface

In addition to the front panel and keypad controls, the Eye-Pal SOLO introduces a new method of control through the use of hand gestures. The camera above the scanning area is designed to recognize hand movements, and after motion controls have been activated, the Eye-Pal SOLO will react to hand gestures.

By default, the motion controls are disabled and need to be activated by holding down the pause/resume button on the front of the device for 3 seconds, after which you will be informed that gesture controls have been activated. Activating motion controls does not restrict you from also using the buttons on the device or the keypad and is simply meant to provide an additional method for control.

The motion controls for the Eye-Pal SOLO are very limited compared with the keypad and can only be used in reading mode to pause/resume the reading or to read the previous sentence. To pause the reading, you simply need to move your hand slowly above the printed material from left to right. Repeating this gesture will cause the reading to resume. By moving your hand from right to left, you may read the previous sentence. This gesture can be repeated as many times as necessary to reach the desired position in a document.

In our experience, we found the gesture controls to be responsive and an interesting feature. We learned that the gestures need to be made slowly across the scanning area—if your hand moves too quickly or is too close to the camera, the gesture may not be recognized. Additionally, gestures cannot be made too quickly one after another, which makes the process of moving backwards in the document time consuming.

The motion controls are an interesting idea and do provide an easy way to pause/resume the reading and go back a few sentences. However, after using the Eye-Pal SOLO for an extended period, we found ourselves using the keypad rather than the motion controls because it felt more comfortable.

Scanning One-Page Documents

Scanning a simple one-page document, such as a memo, flyer, or letter, is a quick and easy process with the Eye-Pal SOLO. Its physical setup makes it easy to rest the document flat on the scanning surface and the orientation of the paper does not matter. The OCR is very successful at recognizing the correct letters and words, and the error rate when using a sheet of simply formatted text is very low.

As far as page formatting is concerned, the Eye-Pal SOLO is capable of recognizing paragraphs and headers in a document, and if hooked up to a monitor, the different page sections are identified visually through the use of line breaks and enlarged fonts. However, there is no speech descriptor to identify the location of headers or paragraphs. Although users can find the number of headers in a document by pressing the up and down keys simultaneously, there is no way to navigate between them or to know where they are in a document unless you are able to use an attached monitor.

This issue aside, the Eye-Pal SOLO works very well when dealing with these types of one-page documents. The documents are easy to position, the scan is very quick, and the text read aloud is accurate. This is the area in which the Eye-Pal SOLO performs at its best.

Scanning Text on Glossy Paper

We tested the Eye-Pal SOLO using several magazines with high-gloss pages that featured columned text, images, and tables. The two pages of a fully opened magazine are too large to place on the scanning area all at once as the device is only capable of examining one full page at a time. This requires positioning the magazine so that only one page is on the scanning area, which can be a little difficult at first as the magazine must be positioned on the scanning area without allowing hands to get in the way of the image. If the scanning area does accidently capture a portion of the next page, it can result in cut-off words and sentences being included in the reading. Although this problem can be resolved, it does take some practice.

After the magazines had been properly positioned, we found the Eye-Pal SOLO had no difficulty with glossy pages as it was able to recognize the text on the magazine page just as successfully as with the plain paper document. It was also very successful in recognizing columns on a page and reading the text in the correct order. We did encounter some problems when attempting to scan pages with images and tables. The Eye-Pal SOLO is programmed to ignore images, meaning it will simply skip over the image and not provide any information to the user that the document even contained images. However, sometimes the Eye-Pal SOLO would attempt to convert images to text, which resulted in garbled text. When encountering tables, it had difficulty maintaining the formatting in the table, and the resulting text could be very confusing and difficult to parse through, particularly if relying solely on the speech output. For simpler text-only articles, the Eye-Pal SOLO works well, but the introduction of more complex formatting and diagrams can cause issues.

Scanning Books

In addition to letters and magazines, several hardback and paperback books of varying sizes were used in this evaluation. As with the magazines, positioning the book on the scanning surface posed some problems. Unlike a traditional scanner, which requires the books to be positioned face down, the Eye-Pal requires the books to be positioned face-up. This requires users to manually hold the book open during the scanning process without their hands getting in the way of the image. This can be difficult when using books with a very tight binding, such as paperbacks. Even for smaller books where both pages fit on the scanning area, the books had to be picked up and placed back down every time a new page was to be scanned.

Once the book was properly positioned, however, the Eye-Pal SOLO was successful in scanning the text with little to no error. The issues with images and tables mentioned in the previous section were repeated when scanning books. The Eye-Pal can be used to read books, but the process takes some practice.

Eye-Pal SOLO LV's Video Magnification Functionality

The video magnification functionality offered by the Eye-Pal SOLO LV uses the neck camera to provide a live video feed to the monitor (not included). To use the video magnification function, the user presses the "mode" button on the keypad, which brings up a magnified view of the scanning area. The keypad for the Eye-Pal SOLO LV can be used to control the video magnification settings, which consist of switching between four levels of magnification and 14 high-contrast color settings.

Adding video magnification capability to this device is certainly a welcome feature; unfortunately, this feature does not work well on the Eye-Pal SOLO LV. In particular, the video camera on the Eye-Pal SOLO LV is of a lesser quality than that generally used in video magnifiers. The video camera has a noticeable delay and low frame rate, which can make it difficult to use. This is particularly noticeable when moving a document around the platform, as the quality of the video stream makes it difficult to follow a line of text when moving the document from left to right or top to bottom. Attempts to use its video magnifier feature as a handwriting aid were also met with difficulty due to these same problems.

Another issue we encountered with the video magnifier feature was how it worked with glossy materials. This includes magazines, flyers, book covers, and other text printed on high-gloss paper or plastic. The light attached to the neck camera creates a noticeable glare on the reading surface of the paper. The glare can make parts of the text simply unreadable, particularly on higher magnification settings.

The video magnification functionality offered by the Eye-Pal SOLO LV is far below the standard set by other video magnifiers on the market, and it is not ideal for extensive use, as either a writing or reading aid. Its limited functionality and poor video quality limit it to only the most basic use.

The Bottom Line

Overall, the Eye-Pal SOLO is a versatile unit that provides effective and relatively accurate OCR, and the SOLO LV can also act as a very basic video magnifier. Although it lacks the functionality and features that come with OCR software for your PC, or a standard video magnifier, the convenience of a single unit that can quickly scan and read documents with a minimum of fuss while also acting as a simple video magnifier will certainly appeal to some users of assistive technology.

The convenience and simplicity of the unit are its strengths, but they come at a cost of functionality and depth. Users looking for a quick and easy solution for reading documents will likely enjoy the Eye-Pal SOLO and SOLO LV, whereas more advanced users may prefer purchasing OCR software and/or a traditional video magnifier.

Product Information

Manufacturer: ABISee, Inc., 20 Main St, Suite G2, Acton, MA 01720; phone: 800-681-5909; website: www.abisee.com.

Product: Eye-Pal SOLO.

Price: $1,995.

Product: Eye-Pal SOLO LV.

Price: $2,595.

Refreshabraille Portable Braille Display and Keyboard: A Product Evaluation

In 1997, I purchased a state-of-the-art braille display for my desktop computer. Its 85 cells were housed on a flat board that was considerably heavier and bigger than the largest laptops of today. Although the package included a custom-made backpack (nearly twice the length of any other backpack I have ever owned), I never carried that display anywhere. For one thing, it cost between $12,000 and $15,000, and for another, it was simply too large and heavy to carry out of the office. For the computing culture of the time, it was a remarkable tool, and it still functions well today. But for blind and sighted users of technology, today's computing culture requires tools that lend themselves to being as mobile as we are. With its 18-cell Refreshabraille, the American Printing House (APH) for the Blind has accomplished precisely that, and produced a product with remarkable versatility as well.

Description

The APH Refreshabraille has a footprint about the size of a standard index card (about 3 by 5 inches) and weighs about 11 ounces. Housed in a sturdy metal case, it is both a braille display and keyboard. With the unit oriented as the manufacturer suggests, the braille display itself is at the top or furthest from you. There are 18 8-dot piezoelectrical braille cells. Below these are 18 corresponding cursor routing buttons, and below those are three evenly spaced rectangular buttons. Next are the six keys for braille input, arranged in a straight line. Just below the six keys, positioned in the center as a space bar might, is a round joystick or navigation stick, and directly below it is the actual space bar. On either side of the space bar are two more keys, used for braille dots 7 and 8 and for several other functions. It should be noted that while most devices offering 8-dot braille input position the keys for dots 7 and 8 on the same line as the keys for dots 1 through 6, thus requiring the user to use the little finger of each hand to activate them, the Refreshabraille's smaller width necessitated placing these two keys below the rest and are thus activated with the thumbs.

Centered along the front edge (closest to you) of the device is the power button. The power button is flush with the edge of the unit itself, so that the overall shape and feel of the unit is smooth and sleek. The USB port is located in a cleverly cut out section on the bottom of the unit, so that when a USB connection is used, it lies neatly beneath the braille display and is completely protected.

The Refreshabraille battery requires about two hours to fully charge and provides about 30 hours of use via Bluetooth or up to 100 hours on a USB connection before recharging. Although it can be charged via an AC adapter, APH does not include one in the package, assuming that most customers will prefer the convenience of charging via the provided USB cable. If a customer's circumstances or preferences dictate charging the unit with AC power, however, any standard AC adapter will work. The battery is not user replaceable. However, according to the documentation, APH anticipates that customers will use their units for many years before ever needing to worry about sending them back for battery replacement.

The Refreshabraille package includes a USB cable (with a mini USB connector for the Refreshabraille and a standard connector for plugging into a PC or other device), a CD containing all documentation and available drivers, and hardcopy quick-start sheets in both print and braille.

When powered off, all dots on the display are in the "up" position. Pressing the power button for about two seconds causes the unit to vibrate briefly and then display the message "APH" plus serial number. Holding the power button in again results in another vibration and puts all of the dots in the up position, indicating that the unit is powered off. If powered on while connected to a USB port, the message "charging" is displayed.

You can check battery status and other settings regardless of whether the unit is connected to a device by pressing a combination of buttons on the unit. Changing any of the menu settings is easily accomplished by pressing a corresponding cursor routing key and selecting the desired choice.

Making Connections

Using either its USB or Bluetooth capabilities, the Refreshabraille can facilitate braille input and output with a variety of assistive technology devices. In addition to braille support for any computer running JAWS or Window-Eyes, the Refreshabraille also works well with a wide variety of Bluetooth-enabled mobile phones and PDAs. (It is no coincidence that the footprint of the Refreshabraille is exactly the same as the Braille Plus Mobile Manager, the APH adaptation of the LevelStar Icon. The two products stack nicely or can be placed neatly in a vertical or horizontal configuration, still taking less table-top space than a dinner plate. The Refreshabraille works particularly well with the Braille Plus Mobile Manager and LevelStar Icon.)

The CD that ships with the Refreshabraille contains drivers for interfacing the display with JAWS or Window-Eyes on a PC, or Talks or Mobile Speak on a mobile phone. Installing the drivers was straightforward. Instructions given were clear and easy to follow, and installations ran as expected. The only serious roadblock in this regard came with connecting Refreshabraille to an Asus EEE netbook. Because the netbook has no CD drive, logic dictated that copying the files to a USB flash drive and running them from there should serve as a reliable substitute. It didn't. Once an external CD drive was connected and the necessary file drawn from there, however, the connection was made swiftly and solidly. Because few laptops and netbooks come equipped with built-in CD drives, the addition of some secondary media source (an SD card or flash drive, for instance) containing all necessary documentation and drivers would be a welcome enhancement to this product.

If you have an Icon from LevelStar or Braille Plus Mobile Manager from APH, the interface between Refreshabraille and these devices is particularly impressive. Initially, there was some difficulty connecting to Braille Plus via Bluetooth. The USB connection was made almost instantly and worked exactly as it should, but the wireless advantage of Bluetooth connection is, of course, one of the product's attractive features. It turned out that the unit required reflashing, a brief and painless exercise, but such effort should be unnecessary. In any event, once the issue was resolved, the Bluetooth connection was swift and seamless and worked beautifully. It should be noted that Refreshabraille can connect to only one device at a time. If, for example, you pair it with a PDA and a mobile phone, you will need to break and re-establish the connections (pairings) accordingly.

How It Works

Once the Refreshabraille is properly connected, the APH power-up message plus serial number is immediately replaced by whatever message is displayed on the visual screen of the computer, PDA, or phone being accessed. To bring focus to a particular character shown on the display, the corresponding cursor routing button can be pressed. To move forward and back through the information displayed, the left and right buttons below the cursor routing keys act as panning or scrolling keys. The joystick can be employed at this point, to arrow up and down lists or lines of text, and pressed to select an item from a menu. Text can be entered from the braille-input keys, which offer smooth and quiet operation. What type of braille is entered, of course, depends on the setting of the device being accessed with the Refreshabraille. Entering text in Microsoft Word, for example, on my netbook, I enter computer braille (basically Grade 1 plus ASCII punctuation marks). With the Braille Plus Mobile Manager, on the other hand, which is already set to translate braille, I enter Grade 2 characters. It is worth mentioning that for those key combinations that require the addition of dots 7 and/or 8, the placement of those keys (requiring action with the thumbs rather than pinkie fingers) is a bit awkward at first, but quickly becomes comfortable.

Driving Your Device from Refreshabraille

Although many users find that the access a refreshable braille display product affords a blind user to the computer or other screen is payback enough for purchasing such a unit, it warrants stressing that the Refreshabraille is also a keyboard, and thus facilitates braille input. In addition to typing text from the Refreshabraille, whether it's just sending a text through your phone or composing your first novel on the computer, you can issue a host of other commands from the braille keyboard as well. Each of the screen-reading applications with which Refreshabraille interfaces provides its own list of key assignments, some much more detailed than others. Somewhat akin to the chording technique for issuing commands on a variety of braille notetakers, Refreshabraille's eight braille dot keys, space bar, joystick, and sometimes scrolling keys and/or cursor routing buttons are called to service in myriad combinations to enable the user to issue such keystroke commands as "tab," "enter," "backspace," "page-up," "page-down," etc., all from the Refreshabraille itself. The key here is versatility. If your preferred method of entering data or issuing commands is from your computer's keyboard or mobile phone, there is no need to issue any commands or text strings from the Refreshabraille. You can simply use it as a tactile "window" to the screen in question.

Bottom Line

The Refreshabraille portable braille display and keyboard is an example of what assistive technology for blind and low-vision people should be. Clearly, the product design was well conceived and well executed, and the result, albeit complex and powerful technology, is relatively simple for the typical user to enjoy. If having braille access to your computer, your phone, or compatible PDA is of high importance to you, this is a versatile and relatively affordable product that stands alone in the blindness products marketplace. The APH Refreshabraille sells for $1,695. For more information or to order, visit the APH website or call 800-223-1839.

Seven Days with the iPad: An Accessibility Evaluation

A great deal has been written, blogged, and podcasted regarding Apple's iPad, and Brad Hodges' article "24 hours with the iPad" started our coverage in the May 2010 issue of AccessWorld. I will now follow up with my observations after 7 days with the iPad. In this article, I'm going to take a look at the iPad from a non-visual perspective and briefly discuss how its VoiceOver screenreader works in general. I will then go into more detail on how VoiceOver works with a select few applications (apps). However, what initially intrigued us AFB TECH lab rats the most about the iPad was its large screen and the potential for accommodating people with low vision. In fact, that was originally going to be the focus of this article, but after a couple days of playing with the iPad, I realized I had enough for a full article from the non-visual perspective. I then decided, along with Lee Huffman, our new AccessWorld editor, to take a tag-team approach and write two articles. You can read about Lee's thoughts on the iPad's Zoom and other features that might accommodate a person with low vision in an upcoming issue.

What is an iPad?

You may have heard the iPad described as a very large iPhone or iPod Touch, and that description is somewhat accurate. However, in addition to the size, there are some other significant differences that I hope to illuminate in this article. There are two versions of the iPad: the iPad Wi-Fi and the iPad Wi-Fi + 3G. The iPad Wi-Fi is the original version and it is the one we evaluated for these articles. It accesses the Internet and other data sources wirelessly via a router or a Wi-Fi hotspot you might find at a coffee shop or hotel. The iPad Wi-Fi + 3G version has the additional ability to connect to the Internet anytime you are in range of a cell phone tower. As you have probably heard by now, both versions are powered by a modified version of the iPhone operating system, so they include all the screen-reading, screen magnification, and other accessibility features found in the iPhone and iPod, and those features have even been enhanced a bit. I won't bore you with all the details of how to use these features, but you can check out my original iPhone review to learn more about the basics of using the iPhone.

Photo of the iPad.

Caption: The iPad

The iPad Wi-Fi weighs 1.5 pounds and measures 9.5 by 7.5 by 0.5 inches. The iPad 3G has the same physical dimensions but is slightly heavier at 1.6 pounds. The screen is 5.75 by 7.75 inches on both models and that is about seven times the area of the iPhone's screen. Like the iPhone, iPads have a round, slightly concave "home" button at the bottom center of the device, just below the display screen. They also have a stereo headphone jack, a screen lock button along the top panel, and a rocker volume control on the top of the right-side panel. It also has a small slider switch just above the volume control used to lock the screen display into a portrait or landscape orientation. The speaker is on the right side of the bottom panel. The 3G version also has a tray beside the headphone jack that accepts a SIM card, which allows you to access data from a cellular network.

Each version of the iPad comes with three different levels of onboard memory from which to choose, and pricing between the two versions varies accordingly. The iPad Wi-Fi costs $499 for the 16GB model, $599 for the 32GB model, and $699 for the 64GB model. The Wi-Fi + 3G version costs $629 for 16GB, $729 for 32GB, and $829 for 64GB. I don't have enough fingers and toes to count that high, but my interns tell me that for each memory level, you will pay $130 more for the 3G version than for the Wi-Fi version. Data plans for the 3G version are available from AT&T, and the price is $15 for 250 MB of data or $30 per month for unlimited data.

Is the iPad a Phone?

No, the iPad is not a phone. Even though the 3G model can access data via a connection to cell towers, it has no phone functionality. However, both versions do work with Skype to make calls over the Internet, but you would need to use a headset with a built-in microphone. Also, Skype only works with a Wi-Fi connection, and it will not work with a 3G connection to the cellular network.

Initial Thoughts

First of all, it is just tremendous to once again see Apple step up to the plate and deliver a product with built-in accessibility, something that far too few manufacturers have even considered doing. As a user of both the iPhone and iPod Touch, I was able to hit the ground running because all of the VoiceOver gestures used on those devices work the same way with the iPad. The iPad's larger screen provides a lot more room for displaying information and controls, and you can use VoiceOver to learn the visual layout of the screen. You can then use pointing and other gestures to navigate much more quickly and efficiently than simply flicking around the screen. Many apps, such as the iPod, separate the screen into panes, so you can touch the area of the pane you want and then flick around in that pane. You can also simply slide your finger around the screen, and VoiceOver provides an audio cue to let you know you have passed over the border into another pane. Audio cues also alert you of pop-up panes that appear in certain apps, and VoiceOver also tells you how to dismiss the pop-ups.

Some new gestures available on the iPad also help you to navigate its larger screen. A four-finger swipe left or right moves you from pane to pane, and four-finger swipes up or down move you to the top or bottom of the current pane. Also, a two-finger scrubbing motion will back out of some screens in certain apps. The rotor has also added a line element, allowing you to navigate by line in certain apps.

The iPad's introduction of accessible touch-typing on a flat-panel touch screen is something that I thought would not be possible just a couple years ago. However, Apple has pulled it off by adding a new touch-typing option in addition to the standard typing method available on the iPhone and iPod Touch. It is now possible to hover over the virtual keyboard and type in a manner similar to how you would type on a standard physical keyboard. When you touch a letter, VoiceOver speaks the letter, and when you lift up your finger, it enters the letter. Another helpful VoiceOver enhancement to the keyboard is that it now also speaks a phonetic pronunciation of each letter. For example, if you highlight a letter, it will say "A alpha, B bravo," etc. That is also the case when you navigate a text field letter by letter. The touch-typing feature is certainly something you have to get used to, but it works very well with a little practice. I have only used it for entering text for a few hours, but I am up to about 25 words per minute so far. That compares to my 75 words per minute rate when typing on a standard keyboard. Apple sells a wireless keyboard accessory as well as a docking station with a physical keyboard that would be much more efficient if you wanted to enter a significant amount of text.

Documentation, Battery Life, and Speaker

The iPad user guide is loaded onto the iPad as a bookmark in the Safari Web browsing app. It is also available in an accessible PDF format on Apple's support site. I have found the battery to last the advertised 10 hours, with a little less life between charges if watching movies. However, unlike the iPhone or iPod Touch, you cannot charge the iPad by connecting it to your computer. Instead, you have to charge it with its AC adaptor plugged into an electrical outlet. The iPad's built-in speaker is significantly louder than the iPhone's, but you will want to use a headset or external speaker if you want to listen to music in stereo.

How Does VoiceOver Work with the Apps?

Just like the iPhone and iPod Touch, VoiceOver supports all of the native apps that come loaded on the iPad. It will also work with many of the thousands of apps available from Apple's App Store. All of the iPhone apps will work on the iPad, but many of them will still be scaled to the size of the iPhone screen, so they will only take up a small portion of the iPad screen. For those of you interested in using VoiceOver and the iPad's Zoom feature at the same time, that is still not possible. However, you can set it so that if you press the home button three times, it will toggle between VoiceOver and Zoom.

I will now discuss in more detail how VoiceOver works with three built-in apps—iPod, Safari, and Mail—and three apps from the App Store: iBook, iWork Pages, and MLB At Bat.

iPod

Because the iPod is one of my favorite apps on the iPhone, I immediately opened it up to see how it works on the iPad. Although the iPod app is fully accessible with VoiceOver, its interface is not like it is on the iPhone. It is actually more similar to the way iTunes is laid out on a computer. You have a sources list on the left side where you can choose among your library categories, such as music, videos, podcasts, and your various playlists. When you choose one of the categories on the left, the right side of the screen displays the list of specific items within that category. There are also accessible controls along the top and bottom of the screen. Although it is possible to flick among all of the items on the screen, it is much more efficient to use a pointing method to move quickly between the four major areas of the iPod screen, and you can then flick or slide your finger to move within each area. That is true of many apps on the iPad's large screen.

Safari

The Safari Web browser is another app that comes loaded on the iPad. Just as with the iPhone and iPod, it is fully accessible with VoiceOver. However, the iPad displays the full page just like a computer would. This allows you to touch various parts of the screen and learn exactly how the page is laid out visually. You can then go directly to a part of the screen and interact with it just as a sighted person would.

If you are comfortable with a flicking method to move element by element through a webpage, you can still do that, but the iPad's large screen makes it more efficient to point to specific elements and interact more efficiently. The rotor is another way to move very quickly among categories of elements, such as headers, links, and form controls. The rotor now also has the line element, allowing you to move by line in webpages. Navigating tables in Safari is also accessible. It takes a bit of getting used to, but you can directly touch the various cells of a table to hear their contents.

Mail

The iPad's Mail app is fully accessible and easy to set up to use with your existing e-mail account. In-box items are displayed in a pop-up list along the left side of the screen, and the body of messages you select appears on the right side. Like the other apps, you can choose to use pointing, flicking, or sliding techniques, or a combination of all three.

One accessibility barrier we did discover with Mail occurs when you want to open up a document that is attached to a message. You can simply double-tap the attachment and it will open up in a window that allows you to read it. However, the problem occurs when you try to close the window with the document; this can be very difficult, even for a sighted person. You have to double-tap the document and then very quickly double-tap a "done" button near the top left corner of the iPad. However, that button does not speak, and you have only a second or so to tap it before the window goes away. A better way to view attachments would be to use the iWork Pages word processor app that I will discuss below. If you have Pages installed, you can double-tap and hold the attachment and then double-tap the icon that says "Open in Pages."

iBooks

The iBooks app is free, available from the App Store, and is probably the one iPad app that has received the most interest from our community. It has deservedly received a great deal of praise for its accessibility, but there are still some bugs that need to be worked out. However, before I mention the problems we discovered, I should say that this app knocks the Kindle and the Sony Reader devices out of the ring as far as accessibility and usability. Unlike those mainly inaccessible products, nearly all of the buttons and controls in iBooks are accessible using VoiceOver. Also, for those of you with low vision, you can easily increase the font size of books to as large as 24 point. Accessing your library of books, learning how to use the app, and reading with the app are all straightforward. The iBookstore is also fully accessible, and there you can find over 100,000 books, including a large selection of free books provided by Project Gutenberg. The Apple support pages report that iBooks are in the ePub digital file type, and in addition to books from the iBookstore, you can sync freely available ePub files to the iPad using iTunes on your computer. You can also download free software to convert existing files to ePub format on your computer. iBooks does not support any other file types at this time. A promising bit of good news about iBooks is that it will also be available on the iPhone and iPod Touch later this summer.

With iBooks, you can navigate books by page or by chapter, or you can read the books continuously with a two-finger downward swipe and pages will turn automatically. You can also skim through a page by simply dragging your finger down the left-hand side of the iPad and listen to each line of text as you touch it. However, you will want to make sure to keep your finger on the left side of the iPad because some lines, such as those at the end of a paragraph, do not extend all the way across the page. The search tool is also accessible. You can type in a word or phrase and a list of all the "hits" of your search term will appear; you can then double-tap an item on the list to move directly to that page. VoiceOver will then start reading at the beginning of the page in which your search term appears.

As far as the problems we discovered when using VoiceOver with the iBook app, the biggest one is the inability to navigate a book by word or character. The rotor control does have choices to navigate by word or character, but it doesn't work with this initial release of the product. That is a fairly important shortcoming because it is often necessary to read by character to find out the proper spelling or pronunciation of a person's name, and it is also very important when reading a technical book or a cook book.

Another bug we discovered occurs when reading a book continuously. Sometimes, but by no means all the time, the last line of a page is skipped by VoiceOver, or the first line is read twice. This does not occur when you read one page at a time. Also, when reading continuously, sometimes two words will be pronounced as if they are connected, without a space in between them. However, this does not occur when reading a page at a time or when skimming line by line.

We purchased some copyrighted books from the iBook Store, and we discovered some strange behavior when reading the beginning of chapters. The first word of each chapter features a drop cap, which displays the first letter of the first word in a very large font, and VoiceOver reads that letter as if it was separate from the rest of the word. The first several words of a chapter are then displayed in all caps, and VoiceOver reads the last capitalized word as if it were connected to the next word. VoiceOver also skips the second line of a chapter when reading continuously or by page.

Another feature of iBooks that is not accessible with VoiceOver is what I will call the dictionary/bookmark/search tool. Without VoiceOver, a sighted person can double-tap any word in a book and it is highlighted, and three buttons pop up above the word, one each for dictionary, bookmark, and search. Tapping the dictionary button opens a pop-up pane with the word's pronunciation and definition. The bookmark button highlights the word in yellow and adds a bookmark in the book's table of contents. The search button brings up a list of all the occurrences of that word in the book. However, because we cannot navigate to specific words with VoiceOver, we cannot use these tools. That being said, the dictionary is the only one of these tools that we cannot access at all. This specific search tool does not work, but as I wrote earlier, the regular search tool, where you type in a search term, does work fine. Plus, there is a work-around allowing you to bookmark a page. You can briefly turn VoiceOver off by pressing home three times quickly, and then double-tap anywhere on the screen where the text of the book appears. Then, if you then tap just above where you double-tapped, the page will be bookmarked. You can then go to the bookmarks in the table of contents to go quickly to that page at a later time.

iWork Pages

iWork is a suite of three productivity apps that allow you to use the iPad for tasks that would normally be done on a computer in a work setting. Pages is the name of the word processor app, Numbers is the spread sheet app, and Keynote is the presentation tool used for creating and showing slide shows. Each app is available for $9.95 from the App Store. For this article, we had time to investigate only the Pages app, and we tested it to see how practical and accessible it is to use VoiceOver for word processing on the iPad.

Pages is a fairly robust word processor, especially for a portable device. Among other things, it allows you to align text as you like, underline, bold, or italicize text, and cut, copy, and paste text.

Reading, creating, editing, importing, and exporting documents are all accessible with VoiceOver. However, just as with the iBooks app, the problem is that you cannot select text in Pages using VoiceOver. Because of that, even though the buttons such as those for making text bold or centered are accessible, you cannot choose the text that you want bolded or centered. We tried this again using the wireless keyboard and it worked much better. Many of the commands used with VoiceOver on a Mac also work on the iPad using the wireless keyboard or the docking station keyboard, and many of the text-selection commands also work. There also are extra navigation options when using the keyboard, such as reading a word, character, line, or paragraph.

Even though I have pointed out some weaknesses with iWork Pages, it still can be a useful tool. I recently attended a meeting to see how it might replace my traditional notetaker, and it did work relatively well. I had the meeting agenda in one file and my meeting notes in another. Although using the touch-typing method on the iPad was not quite as fast as I needed it to be, using the wireless keyboard was plenty fast. The experience was not quite as smooth as using my traditional notetaker, but it was certainly close.

MLB.com At Bat 2010

If you are a baseball fan, then MLB.com At Bat 2010 is an app you will definitely be interested in. It is fully accessible, and for $14.99, you can listen to the audio broadcasts of every game in the season, including playoffs. You can choose to listen to either the home or away team's broadcast, so you can always catch your favorite radio announcers as they provide play-by-play reports.

In addition to listening to the games, you can also use MLB.com At Bat to catch scores and highlights of all the games, and you can even get situational updates for ongoing games, such as two outs and two on with a 3-2 count in the bottom of the fifth. You can also add video of all games for an additional cost if you would like to watch games on the iPad's large screen with your sighted friends.

The Bottom Line

Even though I have pointed out some access barriers that still need to be overcome, the overwhelming majority of features and functions on the iPad are accessible. I have to applaud Apple for once again producing a tremendous mainstream device with accessibility built-in, and at no extra cost. The rest of the world's electronics manufacturing companies are going to have to follow Apple's lead, because the lame old excuses of "undue burden" and "not readily achievable" can now be thrown out the window.

If you were to ask me if you should go out and buy an iPad, I couldn't really make that decision for you because there is no cookie-cutter access solution for everyone. At 1.5 pounds, it is a good pound or so lighter than today's netbooks, but a netbook will do different things than an iPad. The iPad can be a mobile productivity tool, but probably not as productive as your computer or your notetaker. However, there are so many cool things to do with the iPad that many of you may want to consider one. Of course it is much larger than an iPhone or iPod, so those devices may be a better choice for those of you for whom portability is a major concern. It may be a real bonanza for those of you with low vision, so I urge you to read Lee Huffman's article in an upcoming issue for his perspective.

I certainly enjoyed using the iPad. However, there are definitely some trade-offs when comparing it to an iPhone. For example, the large size allows me to somewhat more efficiently investigate a webpage, but the size also makes it much less portable. Also, you can quickly point to and interact with a lot more info on the iPad's large screen, but I like the fact that I don't have to move my hand around nearly as much on my iPhone. The iPad is also very cool to share with friends, and some of my elderly neighbors were simply amazed by the iPad. One neighbor exclaimed, "I can't believe that I can just touch this thing to watch a movie or listen to Frank Sinatra!" It took me more than an hour to pry it out of his hands and get back to work.

For those of you who decide to invest in an iPad, I have one bit of advice for you. It can be very slippery, so you should invest in one of the many skins that are available on the Internet for the iPad. During testing, our iPad slipped off my lap and bent the end of the adaptor as well as the connector port.

This product evaluation was funded by the Teubert Foundation, Huntington, WV.

Product Information

Product: Apple iPad.

Manufacturer: Apple Computer, 1 Infinite Loop, Cupertino, CA 95014; phone: 408-996-1010; customer relations: 800-767-2775; websites: www.store.apple.com and www.apple.com/accessibility.

Price: iPad Wi-Fi: $499 with 16 gigabytes of hard disk space; $599 with 32 gigabytes of hard disk space; $699 with 64 gigabytes of hard disk space.

iPad Wi-Fi + 3G: $629 with 16 gigabytes of hard disk space; $729 with 32 gigabytes of hard disk space; $829 with 64 gigabytes of hard disk space.

Back to School

Lee Huffman

Dear AccessWorld readers,

As the long days of summer pass by, there are three words that strike fear, or at least some apprehension, in the hearts of students of all ages: "back to school." New classes, new instructors, class projects, oral presentations, tests, meeting new people, and even the possibility of changing schools or moving away to college bring about uncertainty, new challenges, and situations never before encountered. This is especially true if you are a student with vision loss.

In this issue, the AccessWorld team has geared its work toward providing valuable information and resources for students, parents, teachers, and professionals in the field to help make educational pursuits a less stressful and more enjoyable experience for those who are blind or visually impaired.

There are two points I want to make clear to all who read the articles in this issue:

  1. You as a student need to take personal responsibility for your education. Ultimately, you are responsible for advocating for yourself. It is your responsibility to prepare in advance, speak to instructors, and tell those you'll be working with exactly what types of accommodations will best meet your needs. It is your education, and it will greatly impact every aspect of the rest of your life, so you need to act responsibly and be proactive in your approach to pursuing your education.
  2. Good planning prevents poor performance. It is never too early to begin planning for the next school term, whether it is elementary school or graduate school. Acquiring and learning to use the assistive technology that best suits your situation, registering as early as possible for classes, obtaining reading lists for classes, and searching out alternative formats should be done as soon as possible. Waiting until the last minute is certain to be a recipe for disaster.

Pursuing a quality education can be difficult under the best of circumstances. Pursuing that education as a person with vision loss can be even more challenging. That is why having and maintaining a positive attitude is crucial to educational success.

The AccessWorld team is very excited to bring you this information, and the team and I sincerely hope you or a student you know will find it useful. I encourage you to read every article as the ideas and resources discussed in this "back to school" issue will certainly help to improve, enrich, and broaden your educational experience. A full spectrum of topics, ranging from knowing your legal rights to obtaining funding to purchase assistive technology, is covered. Please use these articles and resources to your best advantage. We on the AccessWorld team wish you luck and good planning as you head back to school!

Remember, this is the first issue in our new monthly publication schedule. Please look for us again in August!

Sincerely,

Lee Huffman
AccessWorld Editor-in-Chief